posts > security
Hunting for Persistence in Linux (Part 2): Account Creation and Manipulation

Introduction
In the previous blog post, we’ve discussed how to setup auditd and sysmon so that we can start hunting for persistence techniques in linux hosts. Specifically, we discussed some ways we can detect the creation and the use of web shells in a web server.
In this blog post, we will discuss the following:
- Create Account: Local Account
- Valid Accounts: Local Accounts
- Account Manipulation: SSH Authorized Keys
We will give some example commands on how to implement these persistence techinques and some alerts you can use to detect these.
If you need help how to setup auditd, sysmon and/or auditbeats, you can try following the instructions in the appendix in part 1.
Here is a diagram of the things we will cover in this blog post:
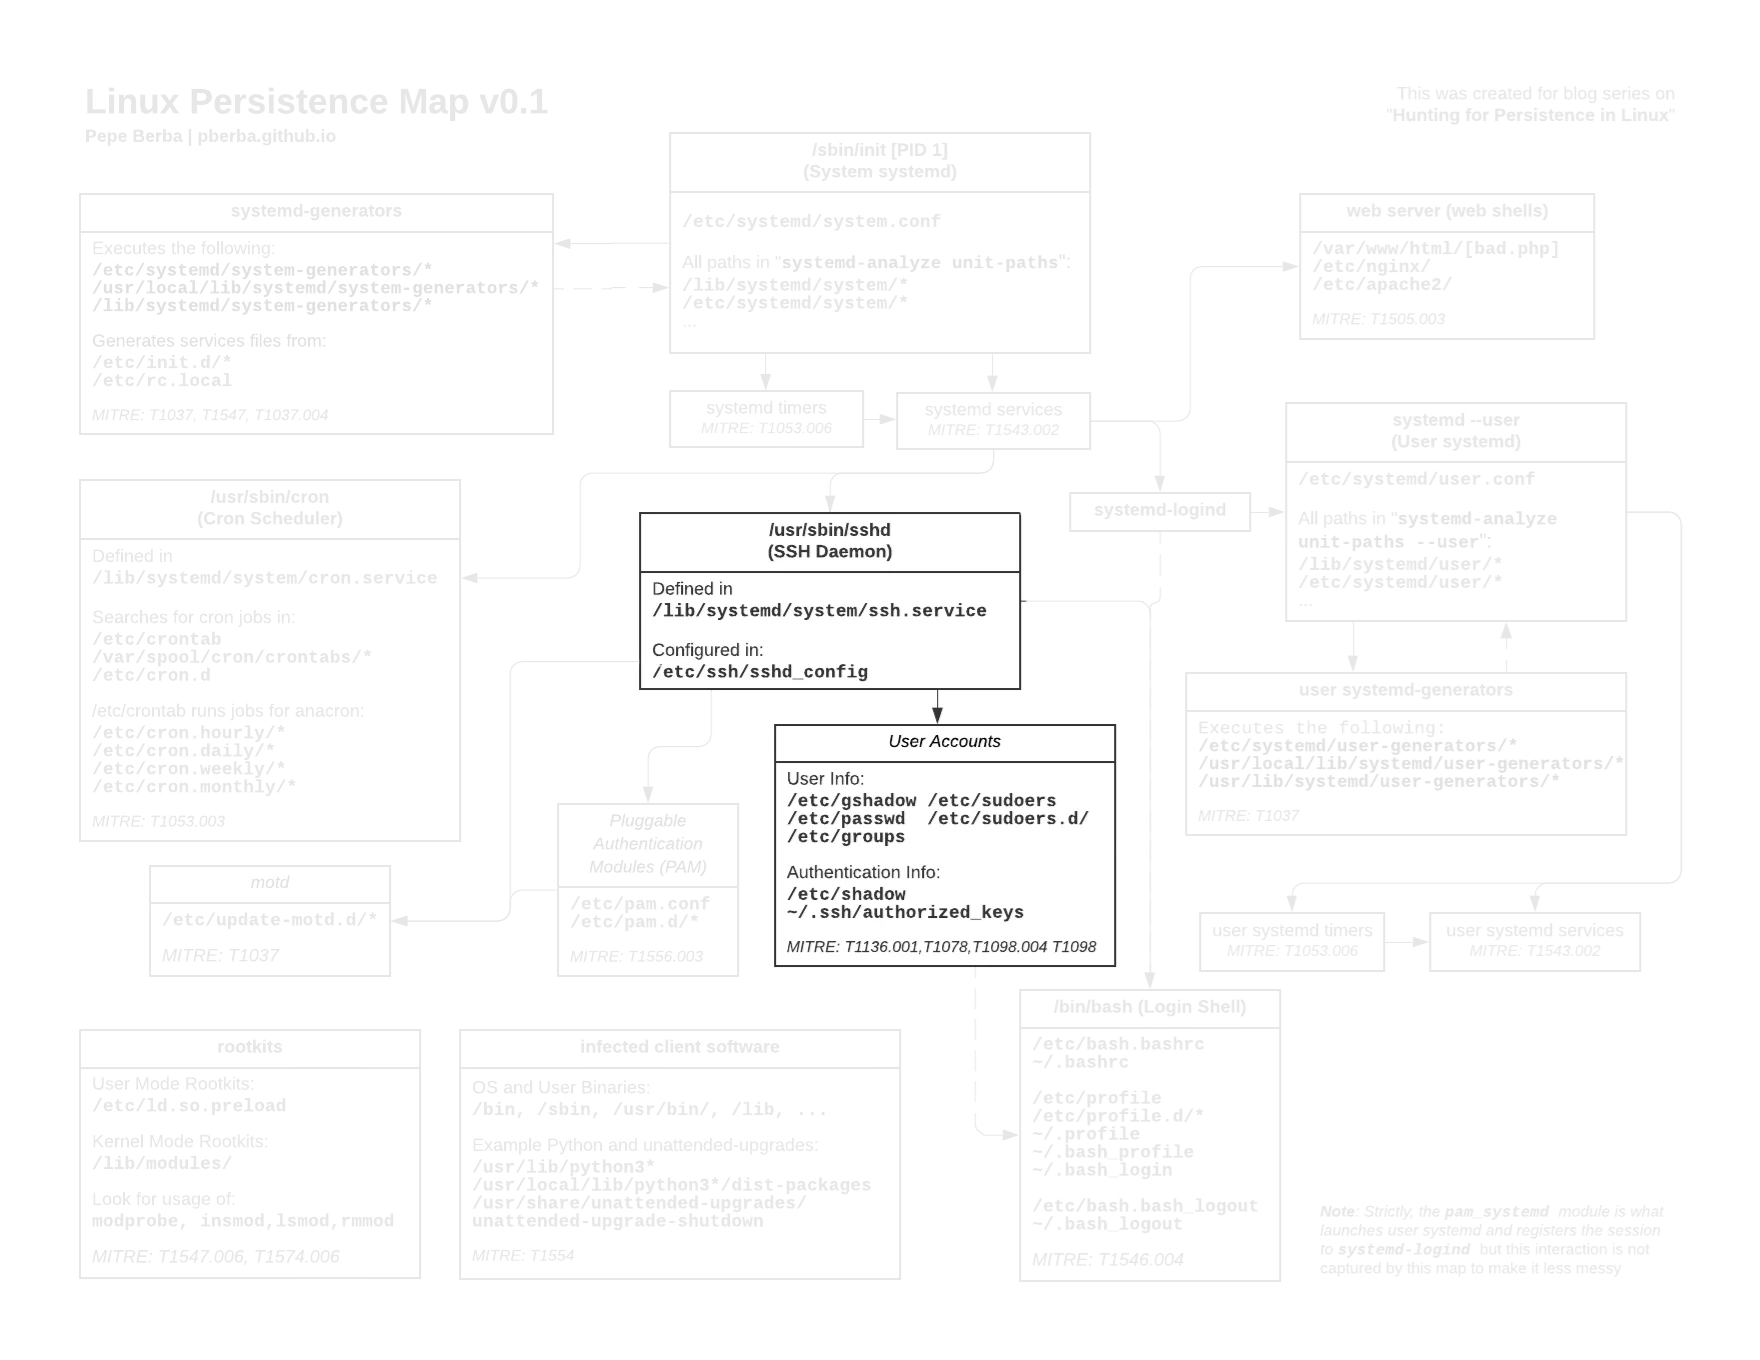 Links to the full version [image] [pdf]
![[image]](/assets/posts/common/20220201-linux-persistence.png)
This is part 2 of a series on persistence in linux:
- Hunting for Persistence in Linux (Part 1): Auditing, Logging and Webshells
- 1 - Server Software Component: Web Shell
- Hunting for Persistence in Linux (Part 2): Account Creation and Manipulation
- 2 - Create Account: Local Account
- 3 - Valid Accounts: Local Accounts
- 4 - Account Manipulation: SSH Authorized Keys
- Hunting for Persistence in Linux (Part 3): Systemd, Timers, and Cron
- 5 - Create or Modify System Process: Systemd Service
- 6 - Scheduled Task/Job: Systemd Timers
- 7 - Scheduled Task/Job: Cron
- Hunting for Persistence in Linux (Part 4): Initialization Scripts and Shell Configuration
- 8 - Boot or Logon Initialization Scripts: RC Scripts
- 9 - Boot or Logon Initialization Scripts: init.d
- 10 - Boot or Logon Initialization Scripts: motd
- 11 - Event Triggered Execution: Unix Shell Configuration Modification
- Hunting for Persistence in Linux (Part 5): Systemd Generators
- 12 - Boot or Logon Initialization Scripts: systemd-generators
- (WIP) Hunting for Persistence in Linux (Part 6): Rootkits, Compromised Software, and Others
- Modify Authentication Process: Pluggable Authentication Modules
- Compromise Client Software Binary
- Boot or Logon Autostart Execution: Kernel Modules and Extensions
- Hijack Execution Flow: Dynamic Linker Hijacking
2 Create Account: Local Account
2.1 Creating account to maintain persistence
MITRE: https://attack.mitre.org/techniques/T1136/001/
Adversaries may create a local account to maintain access to victim systems without any need for additional tools. Rather than configure a backdoor web shell, let’s just create a user!
We run the following commands
sudo adduser --shell /bin/bash --home /var/www/ nginx
sudo usermod -aG sudo nginx
This creates a user named nginx and add this to the sudo group.(Maybe this will trick a junior analyst who might think nginx is a legitimate user of the nginx service)
We can set a password for this or if you want to have public key ssh then you might do additional actions.
mkdir /var/www/.ssh
echo "ssh-ed25519 AA ... " > /var/www/.ssh/authorized_keys
With that, we can now use nginx@<pwned_host> to gain root access to the host.
Often, when you create a local account, you would have to give the account additional permissions for it to be useful. That is why you will see that our detection includes both account creation and modification.
2.2 Detection: User add in auditbeat’s system module
Using the default config auditbeat, we can see that the event.module: system logs process_started events. One of those we would be able to see

But on top of that, we are also able to see the following event.action:
user_added: Adding user to passwd and shadowpassword_changed: Setting user’s passworduser_changes: Adding user tosudogroup

2.3 Detection: Changes in /etc/shadow, /etc/passwd, and /etc/group
Behind the scenes, commands such as passwd and adduser modify the followings files:
/etc/gshadow/etc/shadow/etc/passwd/etc/group
Modifications to these files can create valid users even without running the adduser command.
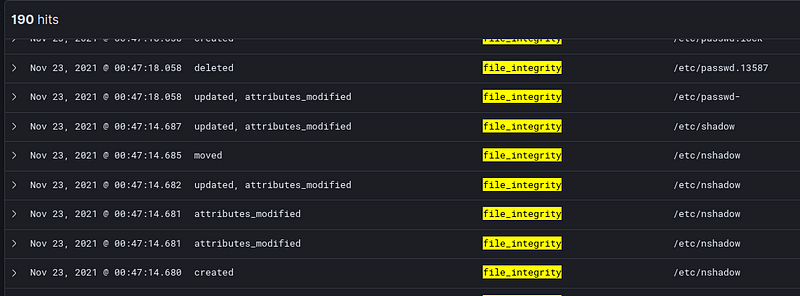
You might notice the creation of /etc/nshadow, /etc/passwd.lock/ and other files. These are byproducts of passwd and usermod command.
Monitoring modifications of these critical files can help detect these kinds of persistence techniques.
2.4 Detection: Using auditd to detect user creation
If we want to natively find these in auditd, we can use the following rules:
-w /etc/group -p wa -k etcgroup
-w /etc/passwd -p wa -k etcpasswd
-w /etc/gshadow -k etcgroup
-w /etc/shadow -k etcpasswd

-w /usr/sbin/useradd -p x -k user_modification
-w /usr/sbin/adduser -p x -k user_modification
-w /usr/bin/passwd -p x -k passwd_modification
And if we want to add auxilarly actions like adding the user to groups, etc:
-w /etc/sudoers -p rw -k priv_esc
-w /etc/sudoers.d -p rw -k priv_esc

-w /usr/sbin/usermod -p x -k user_modification
-w /usr/sbin/userdel -p x -k user_modification
-w /usr/sbin/groupadd -p x -k group_modification
-w /usr/sbin/groupmod -p x -k group_modification
-w /usr/sbin/addgroup -p x -k group_modification
This will look for:
- Any read/write of the sudoers dir
- Any write or update of the
/etc/groupor/etc/passwd - Any action on
/etc/gshadowand/etc/shadow - If specific commands like
useraddandusermodare executed
Here is a raw auditd log for etcpasswd
type=SYSCALL msg=audit(1637599618.765:11426): arch=c000003e syscall=82 success=yes exit=0 a0=7ffeb8ffa160 a1=564262d92020 a2=7ffeb8ffa0d0 a3=2 items=5 ppid=13573 pid=13578 auid=1000 uid=0 gid=0 euid=0 suid=0 fsuid=0 egid=0 sgid=0 fsgid=0 tty=pts0 ses=19 comm="useradd" exe="/usr/sbin/useradd" subj==unconfined key="etcpasswd", type=PATH msg=audit(1637599618.765:11426): item=0 name="/etc/" inode=131075 dev=08:01 mode=040755 ouid=0 ogid=0 rdev=00:00 nametype=PARENT cap_fp=0000000000000000 cap_fi=0000000000000000 cap_fe=0 cap_fver=0, type=PATH msg=audit(1637599618.765:11426): item=1 name="/etc/" inode=131075 dev=08:01 mode=040755 ouid=0 ogid=0 rdev=00:00 nametype=PARENT cap_fp=0000000000000000 cap_fi=0000000000000000 cap_fe=0 cap_fver=0, type=PATH msg=audit(1637599618.765:11426): item=2 name="/etc/shadow+" inode=131557 dev=08:01 mode=0100640 ouid=0 ogid=42 rdev=00:00 nametype=DELETE cap_fp=0000000000000000 cap_fi=0000000000000000 cap_fe=0 cap_fver=0, type=PATH msg=audit(1637599618.765:11426): item=3 name="/etc/shadow" inode=144749 dev=08:01 mode=0100640 ouid=0 ogid=42 rdev=00:00 nametype=DELETE cap_fp=0000000000000000 cap_fi=0000000000000000 cap_fe=0 cap_fver=0, type=PATH msg=audit(1637599618.765:11426): item=4 name="/etc/shadow" inode=131557 dev=08:01 mode=0100640 ouid=0 ogid=42 rdev=00:00 nametype=CREATE cap_fp=0000000000000000 cap_fi=0000000000000000 cap_fe=0 cap_fver=0, type=PROCTITLE msg=audit(1637599618.765:11426): proctitle=2F7362696E2F75736572616464002D64002F7661722F7777772F002D67006E67696E78002D73002F62696E2F62617368002D750031303032006E67696E78
From here we can see the following:
comm="useradd" exe="/usr/sbin/useradd"executable being runname="/etc/shadow"file being modifiedkey="etcpasswd"tag or key from the auditd ruleproctitle=2F7362...which is the hex encoded title of the process which decods into/sbin/useradd -d /var/www/ -g nginx -s /bin/bash -u 1002 nginx
2.4.1 Note on UID of users
If we look at /etc/passwd we will see this newly created user nginx will have a large UID 100X
messagebus:x:104:105::/nonexistent:/usr/sbin/nologin
sshd:x:105:65534::/run/sshd:/usr/sbin/nologin
_chrony:x:106:112:Chrony daemon,,,:/var/lib/chrony:/usr/sbin/nologin
systemd-coredump:x:999:999:systemd Core Dumper:/:/usr/sbin/nologin
user:x:1000:1001::/home/user:/bin/bash
nginx:x:1002:1003:,,,:/var/www/:/bin/bash
Although it is true that Linux systems will assign high UIDs to new users, this is only by convention and an attacker can easily modify this so that newly created accounts can appear as system accounts because they have low UIDs.
2.5 Detection: Using sysmon to detect user creation
We have to potential rules available in MSTIC’s config:
    <RuleGroup name="" groupRelation="or">
      <ProcessCreate onmatch="include">
        <Rule name="TechniqueID=T1087.001,TechniqueName=Account Discovery: Local Account" groupRelation="or">
          <CommandLine condition="contains">/etc/passwd</CommandLine>
          <CommandLine condition="contains">/etc/sudoers</CommandLine>
        </Rule>
        <Rule name="TechniqueID=T1136.001,TechniqueName=Create Account: Local Account" groupRelation="or">
          <Image condition="end with">useradd</Image>
          <Image condition="end with">adduser</Image>
        </Rule>
      </ProcessCreate>
    </RuleGroup>
This will:
- Look for any command that has
/etc/passwdin it. This might catch commands that read or write to/etc/passwd - Look for any commands that us
useraddoradduser
This is a good starting point, however, note that we have already discussed that an attacker can effectively create a user without using useradd/adduser.
Also notice, that the T1087.001 only looks for commands that contain the string /etc/passwd. If we can modify /etc/passwd without directly referencing it in the command, then we can bypass that alert as well.
For example, we go do the following commands as root.
echo "nginx:x:0:0::/home/nginx:/bin/bash" >> /etc//passwd
passwd nginx
This will allow us to create a root user and set it’s password without triggering the 2 alerts above. We didn’t need to use useradd and we were able to reference /etc//passwd and this will not trigger the check for the string /etc/passwd because of the extra / we’ve put.
What we want is something similar
-w /etc/passwd -p wa -k etcpasswd
Because there are many ways to modify /etc/passwd, /etc/shadow/, etc directly and indirectly, we should have an extra rule to detect any changes to these files. As far as I know, the closest thing we have in sysmon for this is.
    <RuleGroup name="" groupRelation="or">
      <FileCreate onmatch="include">
        <Rule name="etcpasswd" groupRelation="or">
          <TargetFilename condition="contains">/etc/passwd</TargetFilename>
          <TargetFilename condition="contains">/etc/shadow</TargetFilename>
        </Rule>
        <Rule name="etcgroup" groupRelation="or">
          <TargetFilename condition="contains">/etc/group</TargetFilename>
          <TargetFilename condition="contains">/etc/gshadow</TargetFilename>
        </Rule>
      </FileCreate>
    </RuleGroup>
Unfortunately, Sysmon Event ID 11, FileCreate is only triggered when a file is created or overwritten.
At the time of writing this blog post, if a file is modified in place, then no event is not triggered.
The rules above will be able to detect modifications done by
vi /etc/passwd
useradd
(This is mainly because of temporary files that these commands make such as /etc/shadow+ but not modifications of /etc/shadow directly)
But not triggered by the following
echo "<TEXT>" >> /etc/passwd
sed -i 's/BEFORE/AFTER/g' /etc/passwd
Worse, even if we are explicitly trying to watch at /etc/shadow, the rule above doesn’t seem to be triggered by the simple
passwd user
This shows that as it is, sysmon will not be completely reliable for file integrity monitoring. In the next blog post, we will show how rules such as T1543.002_CreateModSystemProcess_Systemd.xml might fail to detect installation of systemd services
I would also expand alerting to other user and group modification commands, similar to auditd
    <RuleGroup name="" groupRelation="or">
      <ProcessCreate onmatch="include">
        <Rule name="group_modification" groupRelation="or">
          <Image condition="end with">groupmod</Image>
          <Image condition="end with">addgroup</Image>
          <Image condition="end with">groupadd</Image>
        </Rule>
        <Rule name="user_modification" groupRelation="or">
          <Image condition="end with">usermod</Image>
          <Image condition="end with">userdel</Image>
        </Rule>
        <Rule name="passwd_modification" groupRelation="or">
          <Image condition="end with">passwd</Image>
        </Rule>
      </ProcessCreate>
    </RuleGroup>
3 Valid Accounts Manipulation: Local Accounts
MITRE: https://attack.mitre.org/techniques/T1098/ and https://attack.mitre.org/techniques/T1078/
3.1 Abusing Legitimate Accounts
3.1.1 Modfying existing accounts
Adversaries may obtain credentials or modify the configuration of existing accounts to maintain persistence. Because these accounts have legitimate purpose, the defenders might have them whitelisted in their alerts or be cautious in doing any significant remediation if they are not familiar with the baseline configuration of the accounts.
In this example, we’ll add a backdoor to the www-data account. We add a password and let wwww-data be a sudo-er
sudo passwd www-data
sudo usermod -aG sudo www-data
We modify /etc/passwd to allow us to SSH as www-data from
www-data:x:33:33:www-data:/var/www:/usr/sbin/nologin
to
www-data:x:33:33:www-data:/var/www:/bin/bash
In some server configurations, password authentications might be disabled. We might need to modify /etc/ssh/sshd_config to enable passwords.
PasswordAuthentication yes
And restart service.
sudo service ssh restart
This will now allow an attacker to SSH as www-data and run as sudo.
3.2.2 Other ways of abusing local accounts
Sometimes an attacker might not even need to manipulate an account. Maybe he can just:
- Dump
/etc/shadowand crack hashes - Get private keys in a users
.sshfolders - Downloading CLI service account keys and tokens (GCP and AWS)
- Looking for hardcoded credentials in config files
These might provide more covert ways of maintaining persistence and these are less likely to be detected since they are legitimately used by users.
3.3 Detection: Similar as create account
Similar to creating an account, this might require us to modify files such as /etc/passwd and /etc/shadow so previous detection rules for account creation will also catch this.
Dumping of /etc/shadow will be detected by the auditd rules
-w /etc/shadow -k etcpasswd
For the change in sshd configuration, you can use the following auditd rules
## SSH configuration
-w /etc/ssh/sshd_config -k sshd
-w /etc/ssh/sshd_config.d -k sshd
3.4 Detection: Hunting for created or manipulated accounts with osquery
3.4.1 Looking for logged in users
You can query your fleet to found active sessions. There might be a persistence session there you don’t know about.
Query
SELECT type, user, host
FROM logged_in_users
WHERE type = 'user';
Result
+------+----------+-----------------+
| type | user     | host            |
+------+----------+-----------------+
| user | www-data | 1.2.3.4 |
| user | user     | 1.2.3.4 |
+------+----------+-----------------+
3.4.2 Look for account with active passwords
When you have secure images that disable password logins by default (like cloud VMs), then you should not see active passwords.
SELECT password_status, username, last_change
FROM shadow
WHERE password_status = 'active';
+-----------------+----------+-------------+
| password_status | username | last_change |
+-----------------+----------+-------------+
| active          | www-data | 18953       |
| active          | legit    | 18819       |
+-----------------+----------+-------------+\
3.4.3 Look for accounts in special groups
Look for accounts with special permissions that can be used for privesc. Each user should be accounted for.
SELECT uid,  username, groupname
FROM user_groups
JOIN users
USING(uid)
JOIN groups
ON user_groups.gid=groups.gid
WHERE
  (groupname = 'sudo'
  OR groupname = 'root')
  AND username != 'root';
+------+----------+-----------+
| uid  | username | groupname |
+------+----------+-----------+
| 33   | www-data | sudo      |
| 1001 | legit    | sudo      |
| 1002 | nginx    | sudo      |
+------+----------+-----------+
3.4.4 Look for users that have shells set
It’s possible to login as these users. If system accounts have /bin/bash set then this might be a backdoor.
SELECT uid, username, directory, shell
FROM users
WHERE shell != "/usr/sbin/nologin";
+------+----------+-------------+-----------+
| uid  | username | directory   | shell     |
+------+----------+-------------+-----------+
| 0    | root     | /root       | /bin/bash |
| 4    | sync     | /bin        | /bin/sync |
| 33   | www-data | /var/www    | /bin/bash |
| 1000 | user     | /home/user  | /bin/bash |
| 1001 | legit    | /home/legit | /bin/bash |
| 1002 | nginx    | /var/www/   | /bin/bash |
+------+----------+-------------+-----------+
3.4.5 Look for commands related to account creation or manipulation
Similar to what we’ve been setting up in auditd and sysmon. In case the attacker did not clean up the bash history, then we might be able to find traces of bad activities.
This also includes checking for authorized_keys
SELECT uid, username, command
FROM users
JOIN  shell_history
USING(uid)
WHERE  regex_match(command, 'useradd|adduser|passwd|usermod|groupmod|addgroup|groupadd|authorized_keys', 0)  IS NOT NULL;
+------+----------+--------------------------------------------------+
| uid  | username | command                                          |
+------+----------+--------------------------------------------------+
| 0    | root     | passwd www-data                                  |
| 0    | root     | vi /etc/passwd                                   |
| 0    | root     | cat /etc/passwd                                  |
| 0    | root     | echo "ssh-ed25519 AA..." >> .ssh/authorized_keys |
| 1000 | user     | echo "ssh-ed25519 ..." >> authorized_keys        |
| 1000 | user     | usermod -aG sudo legit                           |
| 1000 | user     | sudo usermod -aG sudo legit                      |
| 1001 | legit    | sudo vi authorized_keys                          |
+------+----------+--------------------------------------------------+
3.5 Manual Comands
3.5.1 lastlog
We can use the lastlog to see which users were loggedin recently
>> lastlog | grep -v Never
Username         Port     From             Latest
www-data         pts/1    1.2.3.4  Wed Nov 24 11:17:46 +0000 2021
user             pts/0    1.2.3.4  Wed Nov 24 11:41:22 +0000 2021
legit            pts/1    1.2.3.4   Sun Jul 11 16:18:58 +0000 2021
nginx            pts/1    1.2.3.4  Mon Nov 22 16:59:47 +0000 2021
3.5.2 /var/log/auth.log
Or we can look at recent authentication logs and see which users where used in SSH sessions.
>> cat /var/log/auth.log | grep sshd | grep -i Accepted
Nov 22 16:36:05 test-auditd sshd[13413]: Accepted publickey for user from 1.2.3.4 port 17629 ssh2: ED25519 SHA256:AA...
Nov 22 16:38:42 test-auditd sshd[13446]: Accepted publickey for user from 1.2.3.4 port 18131 ssh2: ED25519 SHA256:AA...
Nov 22 16:54:55 test-auditd sshd[13634]: Accepted publickey for nginx from 1.2.3.4 port 21020 ssh2: ED25519 SHA256:AA...
Nov 22 16:59:46 test-auditd sshd[13683]: Accepted publickey for nginx from 1.2.3.4 port 17676 ssh2: ED25519 SHA256:AA...
Nov 24 10:37:40 test-auditd sshd[11981]: Accepted publickey for user from 1.2.3.4 port 18970 ssh2: ED25519 SHA256:AA...
Nov 24 11:17:45 test-auditd sshd[15854]: Accepted password for www-data from 1.2.3.4 port 18669 ssh2
Nov 24 11:41:21 test-auditd sshd[16566]: Accepted publickey for user from 1.2.3.4 port 17873 ssh2: ED25519 SHA256:AA...
4 Account Manipulation: SSH Authorized Keys
MITRE: https://attack.mitre.org/techniques/T1098/004/
4.1 Adding SSH Authorized Keys
Adding SSH keys is one simple way that an attacker can maintain persistence. Moreover, the authorized_keys file is often abstracted by platforms such as GCP and AWS so engineers rarely interact with these files manually. So if you are able to insert an SSH key, then it will probably stay there for a long time.
The authorized_keys file can be placed in the <home>/.ssh/ directory of each user in the machine.
If we have the following users
root:x:0:0:root:/root:/bin/bash

user:x:1000:1001::/home/user:/bin/bash
nginx:x:0:0:,,,:/var/www/:/bin/bash
Then the we would want to add our SSH keys in:
/var/www/.ssh/authorized_keys/home/user/.ssh/authorized_key/root/.ssh/authorized_keys
Then we can run the following commands
# create .ssh directory if it does not exist
mkdir /var/www/.ssh

echo "ssh-ed25519 AA ... " >> /var/www/.ssh/authorized_keys
echo "ssh-ed25519 AA ... " >> /home/user/.ssh/authorized_keys
echo "ssh-ed25519 AA ... " >> /root/.ssh/authorized_keys
4.2 Some notes on SSH keys in authorized_keys
First, to make it a bit more confusing for the defenders, when adding an SSH key copy the usernames in the other SSH keys.
ssh-ed25519 AAAAC3NzaC1lZDI1NTg3f2vasdcascTcwuq8CVppeNDQv85MQ3fsdsa592q86W1 paul@LP-291221
ssh-ed25519 AAAAC3NzaC1lZDascacasbI1NTE5AAAAIB7q5ZK6GMNO6lTd90yutRohmGPugoCruTL paul@LP-291221
The “email address” in SSH keys are simply comments that can be changed to anything. This is much better than having kali in your backdoor SSH keys.
Next, you can add comments to the SSH keys such as
# DO NOT REMOVE
ssh-ed25519 AAAAC3NzaC1lZDI1NTg3f2vasdcascTcwuq8CVppeNDQv85MQ3fsdsa592q86W1 security-team
ssh-ed25519 AAAAC3NzaC1lZDascacasbI1NTE5AAAAIB7q5ZK6GMNO6lTd90yutRohmGPugoCruTL paul@LP-291221
This might be useful for environments such as Google Cloud Platform.
By default, SSH keys are set project wide and added to all instances in the project with the comment # Added by Google . These SSH keys are “managed” and should be automatically removed when the SSH key is deleted in the project. However, I’ve found that when we add a few whitespaces at the end, the SSH keys are not removed even if they are not found in the project-wide metadata server.
So we add our SSH key and add # Added by Google
# Added by Google
ssh-ed25519 AAAAC3NzaC1lZDI1NTg3f2vasdcascTcwuq8CVppeNDQv85MQ3fsdsa592q86W1 security-team
# Added by Google
ssh-ed25519 AAAAC3NzaC1lZDascacasbI1NTE5AAAAIB7q5ZK6GMNO6lTd90yutRohmGPugoCruTL paul@LP-291221
This makes these SSH keys more likely to be overlooked by defenders.
4.3 Detection: File Integrity Monitoring
By default auditbeat does not monitor these files. You have to know the users of the machine beforehand to be able to monitor the .ssh folder of each user
- module: file_integrity
  paths:
  - /bin
  - /usr/bin
  - /sbin
  - /usr/sbin
  - /etc
  - /root            # <--- Add
  - /home/user/.ssh  # <--- Add
- module: system
  datasets:
    - package # Installed, updated, and removed packages
This allows us to detect changes to the authorized_keys of existing users. If additional users are added, these will be out of scope but they should hopefully be detected by the “create/modify user” detection rules we previously discussed.

4.4 Detection: Auditd
Similar to the FIM, we need to explicitly put the directory of each user to be able to monitor it.
-w /root/.ssh -p wa -k rootkey
-w /home/user/.ssh -p wa -k userkey
This looks for write or updates to those /home/user/.ssh/* and /root/.ssh/*
Here is an example output of the raw auditd log
type=SYSCALL msg=audit(1637609476.111:15803): arch=c000003e syscall=257 success=yes exit=3 a0=ffffff9c a1=563001182d80 a2=241 a3=1b6 items=2 ppid=15409 pid=15410 auid=1000 uid=1000 gid=1001 euid=1000 suid=1000 fsuid=1000 egid=1001 sgid=1001 fsgid=1001 tty=pts0 ses=50 comm="bash" exe="/usr/bin/bash" subj==unconfined key="userkey", type=PATH msg=audit(1637609476.111:15803): item=0 name=".ssh/" inode=526594 dev=08:01 mode=040700 ouid=1000 ogid=1001 rdev=00:00 nametype=PARENT cap_fp=0000000000000000 cap_fi=0000000000000000 cap_fe=0 cap_fver=0, type=PATH msg=audit(1637609476.111:15803): item=1 name=".ssh/authorized_keys" inode=527241 dev=08:01 mode=0100600 ouid=1000 ogid=1001 rdev=00:00 nametype=NORMAL cap_fp=0000000000000000 cap_fi=0000000000000000 cap_fe=0 cap_fver=0, type=PROCTITLE msg=audit(1637609476.111:15803): proctitle="-bash"
4.5 Detection: Sysmon
    <RuleGroup name="" groupRelation="or">
      <FileCreate onmatch="include">
        <Rule name="TechniqueID=T1098.004,TechniqueName=Account Manipulation: SSH Authorized Keys" groupRelation="or">
          <TargetFilename condition="contains">authorized_keys</TargetFilename>
          <TargetFilename condition="contains">.ssh</TargetFilename>
        </Rule>
      </FileCreate>
    </RuleGroup>
If we run the command, and a authorized_keys file does not exist yet this will generate a log
echo "ssh-ed25519 AA ... " >> /var/www/.ssh/authorized_keys
<Event>
  <System>
    <Provider Name="Linux-Sysmon" Guid="{ff032593-a8d3-4f13-b0d6-01fc615a0f97}"/>
    <EventID>11</EventID>
    <Version>2</Version>

    <EventRecordID>12463</EventRecordID>
    <Correlation/>
    <Execution ProcessID="20655" ThreadID="20655"/>
    <Channel>Linux-Sysmon/Operational</Channel>
    <Computer>sysmon-test</Computer>
    <Security UserId="0"/>
  </System>
  <EventData>
    <Data Name="RuleName">TechniqueID=T1098.004,TechniqueName=Acco</Data>

    <Data Name="ProcessId">20667</Data>
    <Data Name="Image">/usr/bin/bash</Data>
    <Data Name="TargetFilename">/var/www/.ssh/authorized_keys</Data>
    <Data Name="CreationUtcTime">2021-11-24 09:22:36.722</Data>
    <Data Name="User">root</Data>
  </EventData>
</Event>
However, if the authorized_keys file already exists then the rule will not be triggered.
Now an attacker can easily bypass this alert by creating the file output of the .ssh folder and not named authorized_keys and renaming it to authorized_keys
echo "ssh-ed25519 AA ... " >> /tmp/keys
mv /tmp/keys /var/www/.ssh/authorized_keys
There might be something wrong with how I define my rules sysmon rules in linux or it might be the version of sysmon installed in my test VM ,but this really shows that sysmon is not viable for file integrity monitoring as it is.
This would also be problematic for other rules which I am referencing for this:
- T1543.002_CreateModSystemProcess_Systemd.xml
- T1053.003_Cron_Activity.xml
- T1037_BootLogonInitScripts_CommonDirectories.xml
4.6 Detection: OSQuery
Aside from the previous osquery queries, if you have a fleet then one way you can monitor authorized_keys is by getting snapshots of your fleet’s authorized_keys
SELECT authorized_keys.*
FROM users
JOIN authorized_keys
USING(uid)
+----------+-----------------+----------------------------------+
| username | key             | key_file                         |
+----------+-----------------+----------------------------------+
| root     | ssh-ed25519 ... | /root/.ssh/authorized_keys       |
| root     | ssh-ed25519 ... | /root/.ssh/authorized_keys       |
| www-data | ssh-ed25519 ... | /var/www/.ssh/authorized_keys    |
| www-data | ssh-ed25519 ... | /var/www/.ssh/authorized_keys    |
| user     | ssh-ed25519 ... | /home/user/.ssh/authorized_keys  |
| user     | ssh-ed25519 ... | /home/user/.ssh/authorized_keys  |
| user     | ssh-ed25519 ... | /home/user/.ssh/authorized_keys  |
| user     | ssh-ed25519 ... | /home/user/.ssh/authorized_keys  |
| user     | ssh-ed25519 ... | /home/user/.ssh/authorized_keys  |
| legit    | ssh-ed25519 ... | /home/legit/.ssh/authorized_keys |
| nginx    | ssh-ed25519 ... | /var/www/.ssh/authorized_keys    |
| nginx    | ssh-ed25519 ... | /var/www/.ssh/authorized_keys    |
+----------+-----------------+----------------------------------+
And investigate the diffs. You can look public keys that are not registered in AWS or GCP. Look SSH keys that are uncommon in your fleet, etc.
Conclusions and What’s next
We’ve seen how account creation and manipulation isn’t just about looking for the useradd command.
We have to also include alerts for modifications of /etc/passwd, /etc/shadow, /etc/gshadow and /etc/group . We also want to look for modifications to authorized_keys. For these file integrity tasks, I’ll stick to auditd and/or auditbeats.
I have yet to find sysmon rules that works well for these scenarios. SysmonForLinux might not be built for this… I’ll ask around and update these blog posts when I get a solution for this.
In the next blog post we’ll go through installed persistence using Systemd, Timers, and Cron.
Photo by Chris Barbalis on Unsplash